Authorization
To sign in to Personal Area, complete the following steps.
1. Open the Personal Area page.
TEST: https://vtb.rbsuat.com/mportal3
PROD: https://platezh.vtb24.ru/generalmp3/auth/login
The authorization page will open.
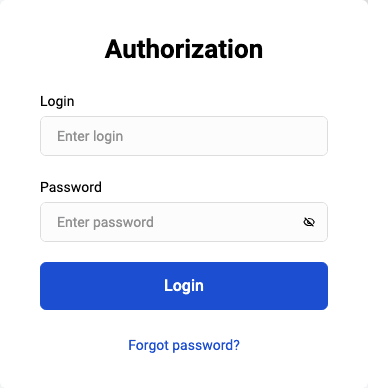
2. Enter your operator login and password in the Login and Password fields.
3. Click on the Login button.
If the credentials are correct, your Personal Area will open.
Logging out
To log out of the Personal Area, click on the  button in the top of the page.
Changing interface language
To change the language in which the interface of your Personal Area is displayed, follow these steps.
- Log in to Personal Area.
- At the top of the page, click on the icon with the globe.
Available interface languages will be displayed.
- Click on the desired language icon.
The Personal Area will automatically be displayed in the selected language.
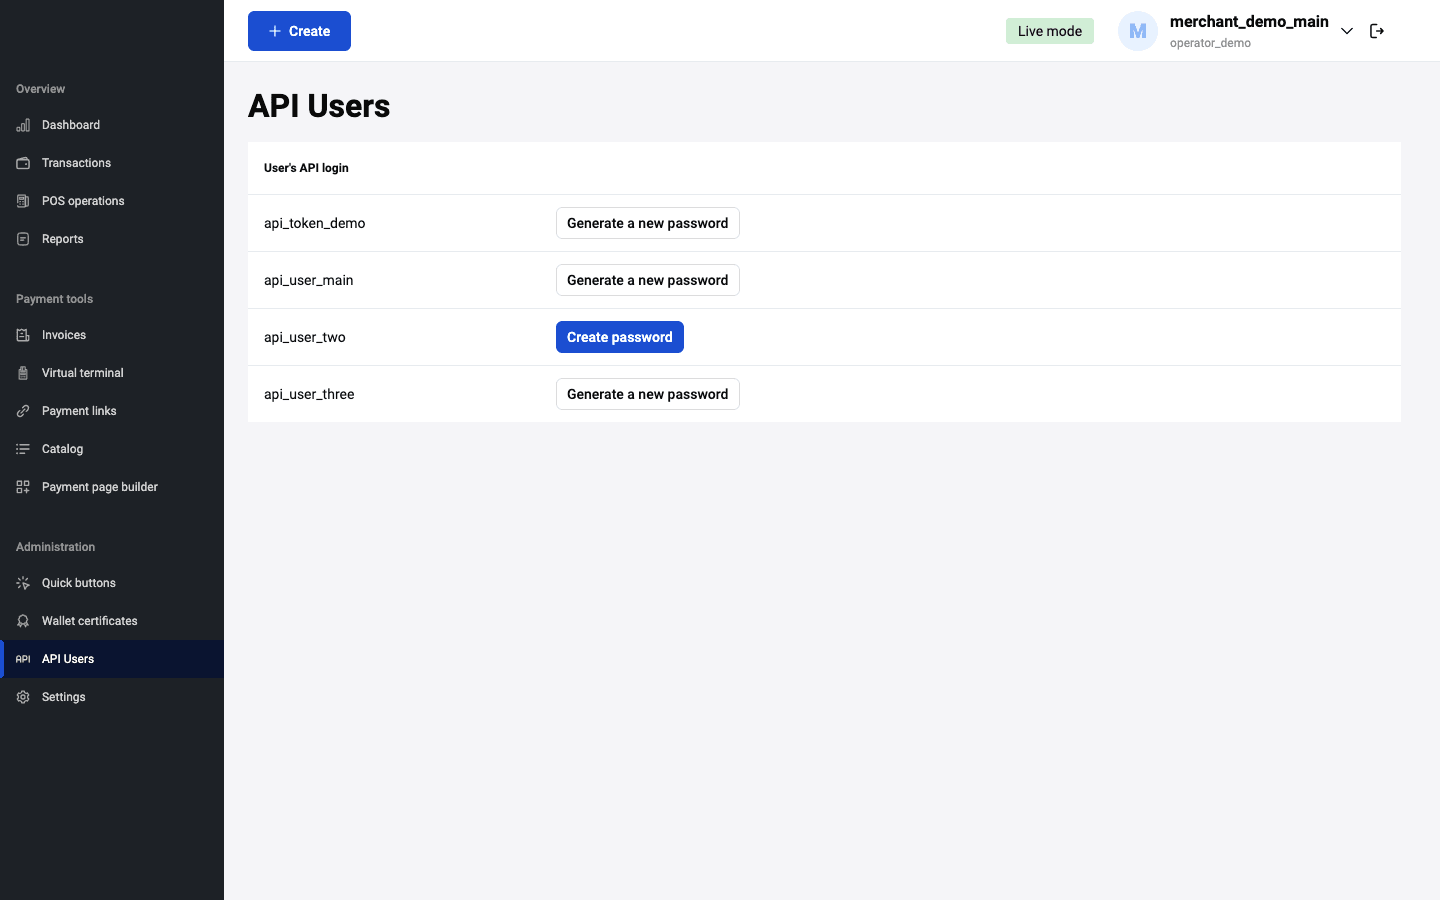
API users
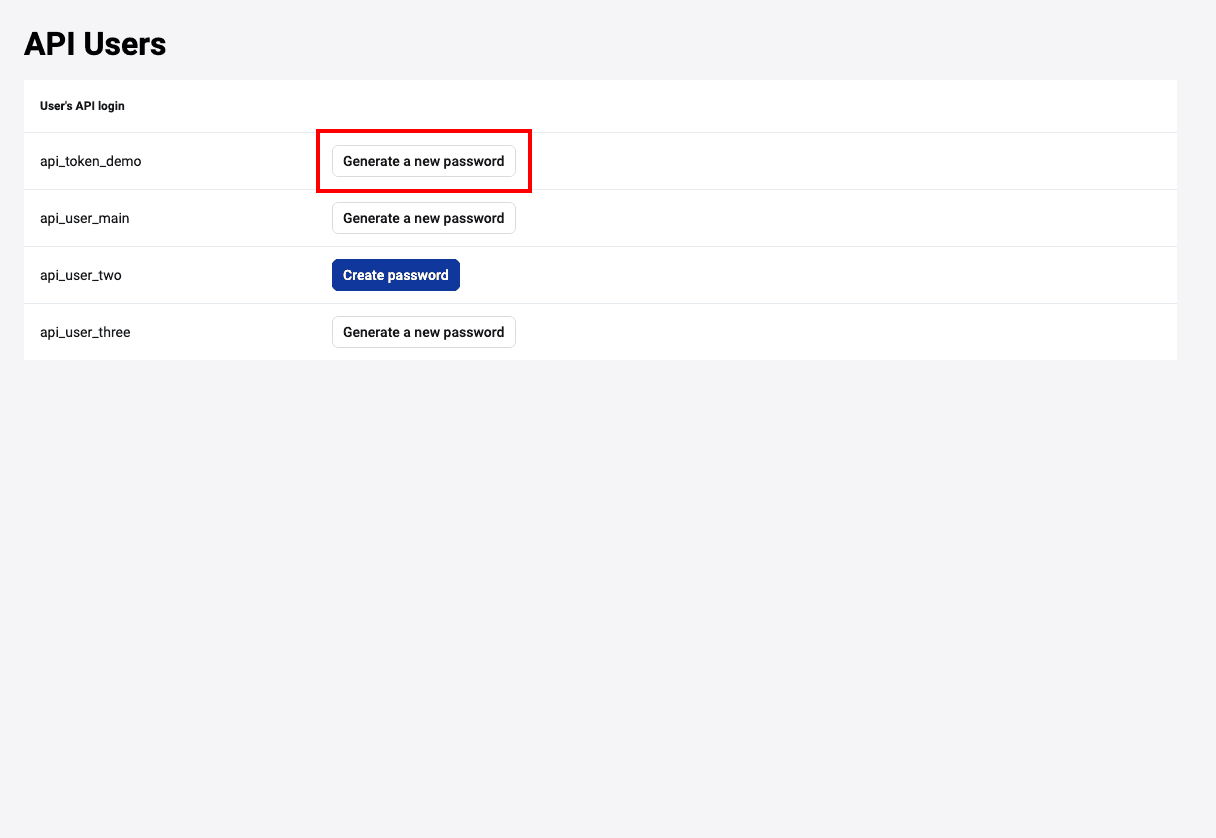
Merchants can create a payment flow as needed. For example, design own fully customized payment page. See more information about API by the link . When you create a Merchant, you receive an email with a login and a one-time password. After that you can generate API password by yourself on the API users page in Merchant Portal.
To display the API users page, click on the ![]() icon in the navigation bar to the left.
icon in the navigation bar to the left.
The page with the list of your active API users will be displayed. If you have child merchants, you can select a child merchant – in this case, active API users of the child merchant will be displayed in the list.
The following actions are available:
-
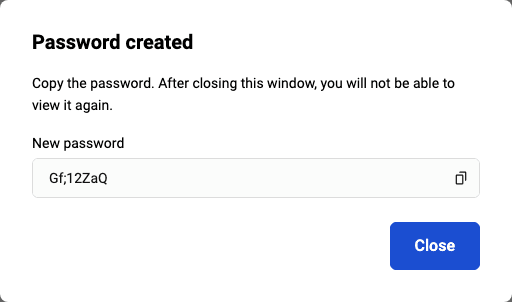
Password creation. To create an API password, click Create password. This button is active for new API users.
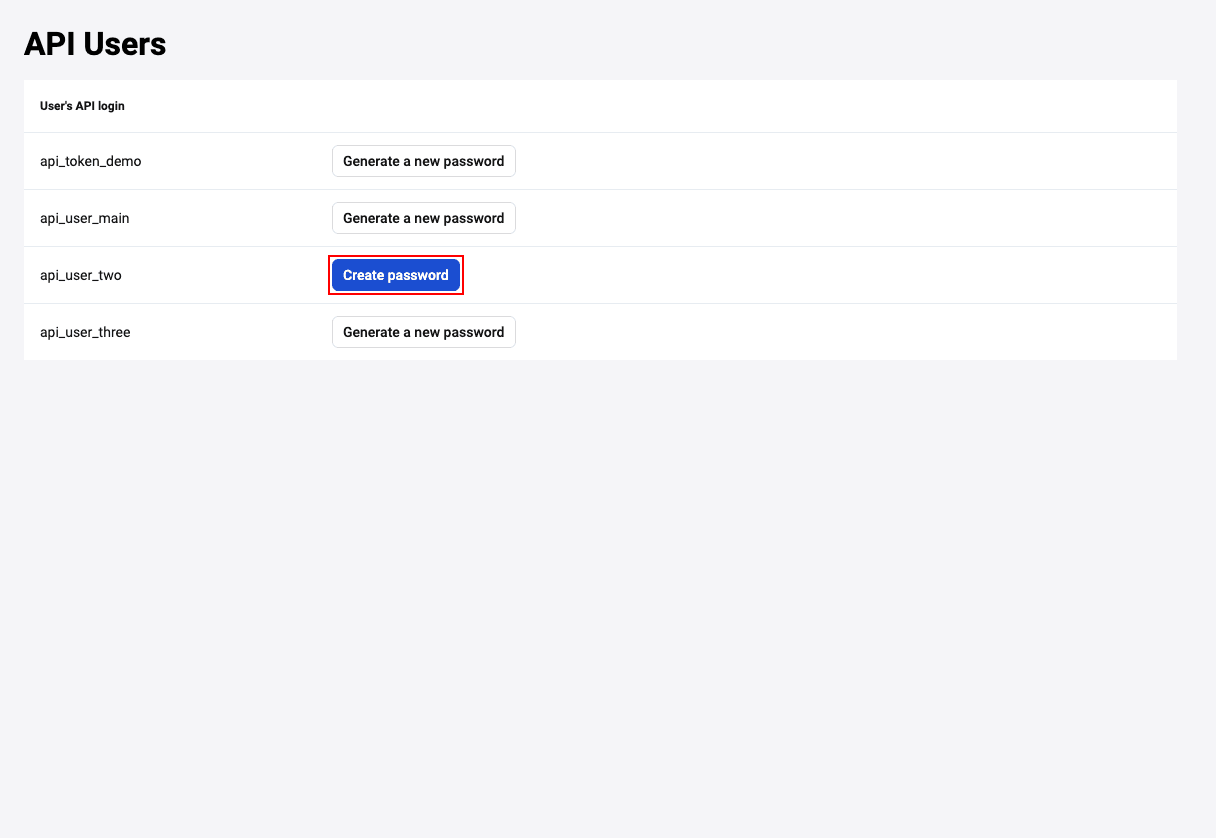
The message about successfull password creation will be displayed. Copy the password before closing the message.
-
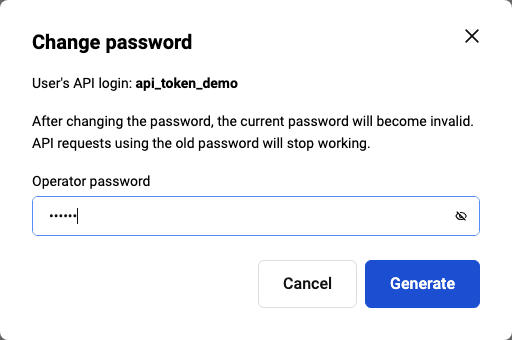
Password change. To change the API password, click Generate a new password. This button is active for users who have already created passwords.
Confirm the action in the window that opens. To confirm, enter the operator's password that you used to log into your Personal Area, and then click Generate.
The message about successfull password change will be displayed.
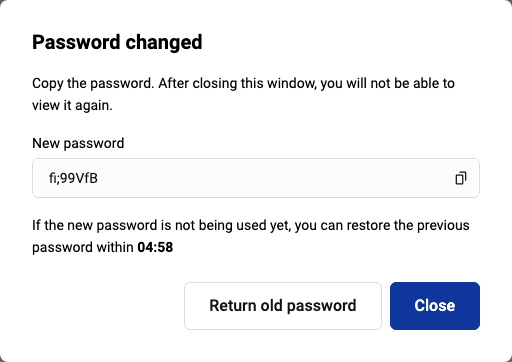
You can return the previous password within the time period specified on the timer. To do this, click Return the previous password. The password will be changed to the previous one and the window will close.
If you do not want to return the password, copy the new password and then close the message.
Settings
To get to the Settings section, in the navigation bar to the left, click ![]() .
.
In the Settings section, you can:
- set General settings
- enable Callback notifications
- change Personal Area password
- specify your email address to be able to recover your password to Personal Area
- set the parameters of the Personal Area (not available in Sandbox).
General settings
The General Settings section allows the merchant operator to configure certain account settings and permissions.
To go to the General Settings section, select Settings on the side menu, and then select General Settings in the Merchant block. The account settings page will be displayed as shown below.
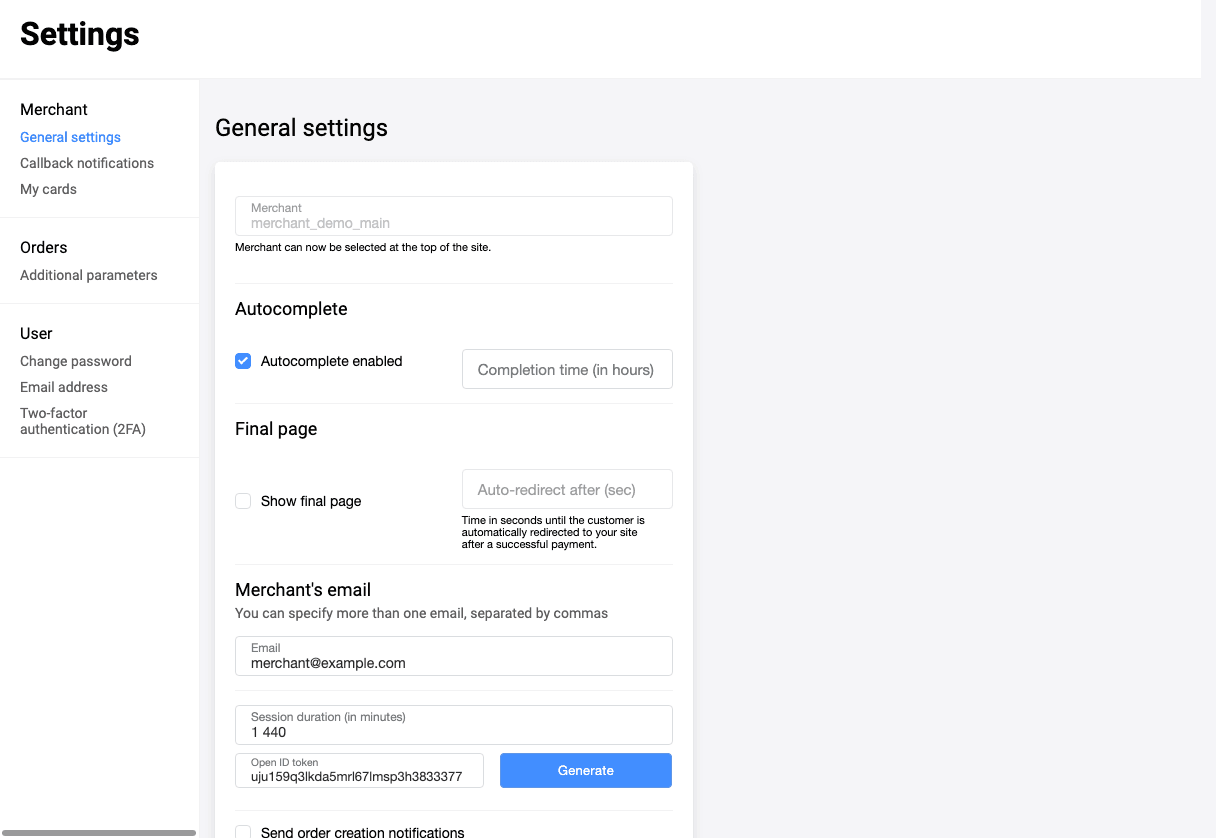
A description of the settings is shown in the table below:
| Field | Description |
|---|---|
| Merchant | Select a merchant the settings will be applied to. Multiple merchants may be available if you have a permission to view transactions of other merchants or have child merchants. |
| Autocomplete enabled | Allows you to enable autocompletion for two-stage payments. |
| Completion time | If autocomplete is enabled, specify the number of hours after which two-stage payments will be automatically completed. |
| Show final page | If enabled, allows you to display the final page upon payment completion |
| The merchant's email address to which notifications will be sent. You can enter more than one email address in this field (separated by commas). The triggers for notification dispatch are configurable. They can be set up for such events as change of transaction status, creation of a binding, etc. | |
| Session duration (in minutes) | The period given for entering the card data from the moment the payment is registered. If payment is not made within the specified period, the order will go to DECLINED status. After that Callback will be sent, if configured. Changing the status of such orders is performed according to the schedule, so slight delays are possible. If you request status on such an order and time has passed on it, the order will immediately be moved to DECLINED status |
| Send order creation notifications | If enabled, the merchant will receive an email notification of the order placement |
| Two-stage payment | Permission to use a two-stage payment scheme |
| Send notifications to the customer via SMS | If enabled, the customer will receive SMS notifications |
| Open Id token | You can generate an Open Id token. Also, manual token entry is available. Read more here |
Changing the fiscalization settings
To configure the fiscalization parameters, you need to configure the parameters of the fiscal data operator (FFD). To do this, perform the following actions.
- Log in to your personal account.
- In the left panel, click FFD Settings.
- In the FFD System list, select the FFD system to which you are connected. The following window will be displayed:
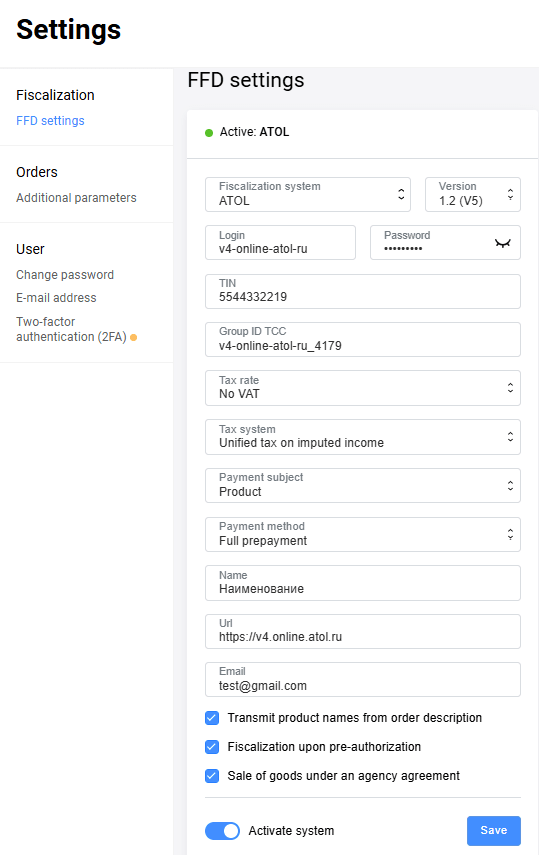
- Make the necessary settings according to the table below:
| Setting | Description |
|---|---|
| Fiscalization system | The FFD system to which you are connected. If you followed the procedure you selected at the previous step. |
| Version | Allows you to select the version of the format of fiscal data: 1.05(V4) or 1.2(V5). By default, the latest version is selected. |
| Login | Enter the login to access the system of the fiscal data operator. |
| Password | Enter the password to access the system of the fiscal data operator. |
| TIN | Enter the taxpayer identification number. |
| POS equipment group ID | ID of the POS equipment group. |
| Tax rate | Select the tax rate, the following options are available:
|
| Tax system | Select a taxation system. The following options are available:
|
| Payment subject | Payment subject attribute. The following values are available:
|
| Payment method | Settlement method sign, the list contains the following values:
|
| Url | Enter the URL of your online store. |
| Additional parameter | Additional user attribute that will be passed to the fiscal data operator. |
| Transmit product names from order description | If the checkbox is selected, product names will be shown in the receipt. |
| Fiscalization upon pre-authorization | Used in two-phase payments. If the checkbox is checked, a receipt will be created when funds are held. Otherwise, the receipt will be generated after the payment is completed. |
| Cloud cash register | It is used for CloudKassir fiscalization system only. Allows you to generate receipts without buying and renting a cash register and without registering the cash register with the Federal Tax Service. |
| Sale of goods under an agency agreement | It is used in case of selling goods under an agency agreement. If this option is selected, you must fill in the shopping cart when invoicing. Moreover, when adding an item to the cart, additional optional fields will be available for filling in. See the details here. |
| Name | This field should be used if you will send requests to register an order without transferring the cart. In this case the specified product name will always be registered. |
| Enter your online store's default email address. | |
| Transmit product names from order description | If the checkbox is selected, product names will be shown in the receipt. |
| Activate system | Enables the fiscalization settings. If the setting is enabled, order data is sent to the fiscal data operator. Otherwise, the fiscalization settings are saved but not applied. |
Click the Save button.
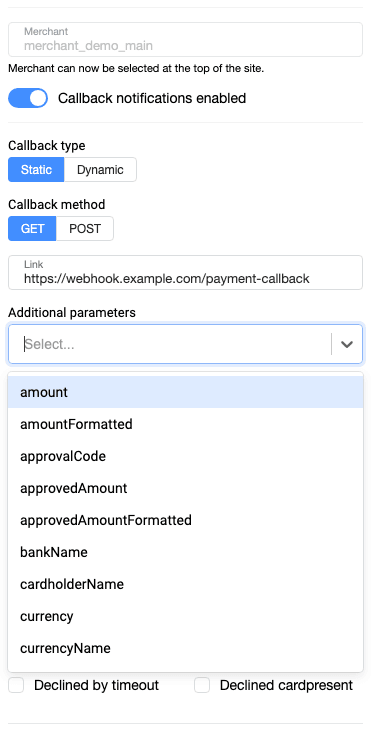
Callback notifications
The Merchant Portal allows you to configure callback notifications. This section may be hidden for some Merchants. So if you don't see it or are not sure how to approach this, please contact the Support Service and we will be glad to help.
More information about callback notifications is available here. The Callback notification settings tab is located under Settings → Merchant → Callback Notifications.
If the User has affiliate sellers, a Merchant selection becomes available in the Merchant selector. To enable callback notification settings, click the Callback notifications disabled toggle:
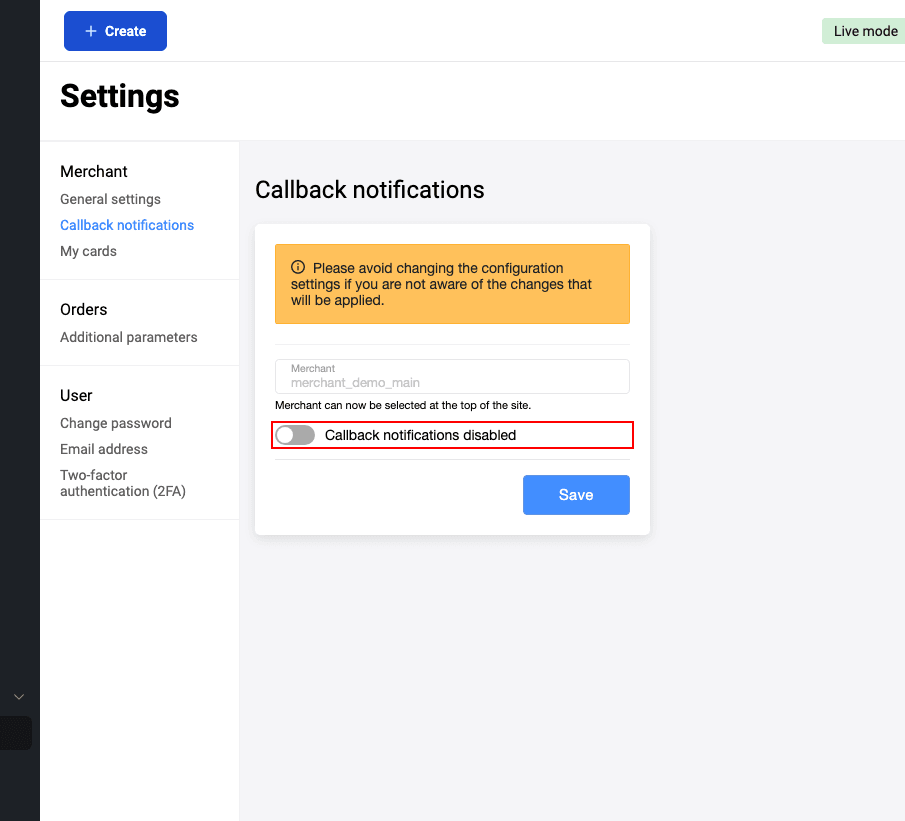
After activating the callback notification functionality, follow the setup process as described below.
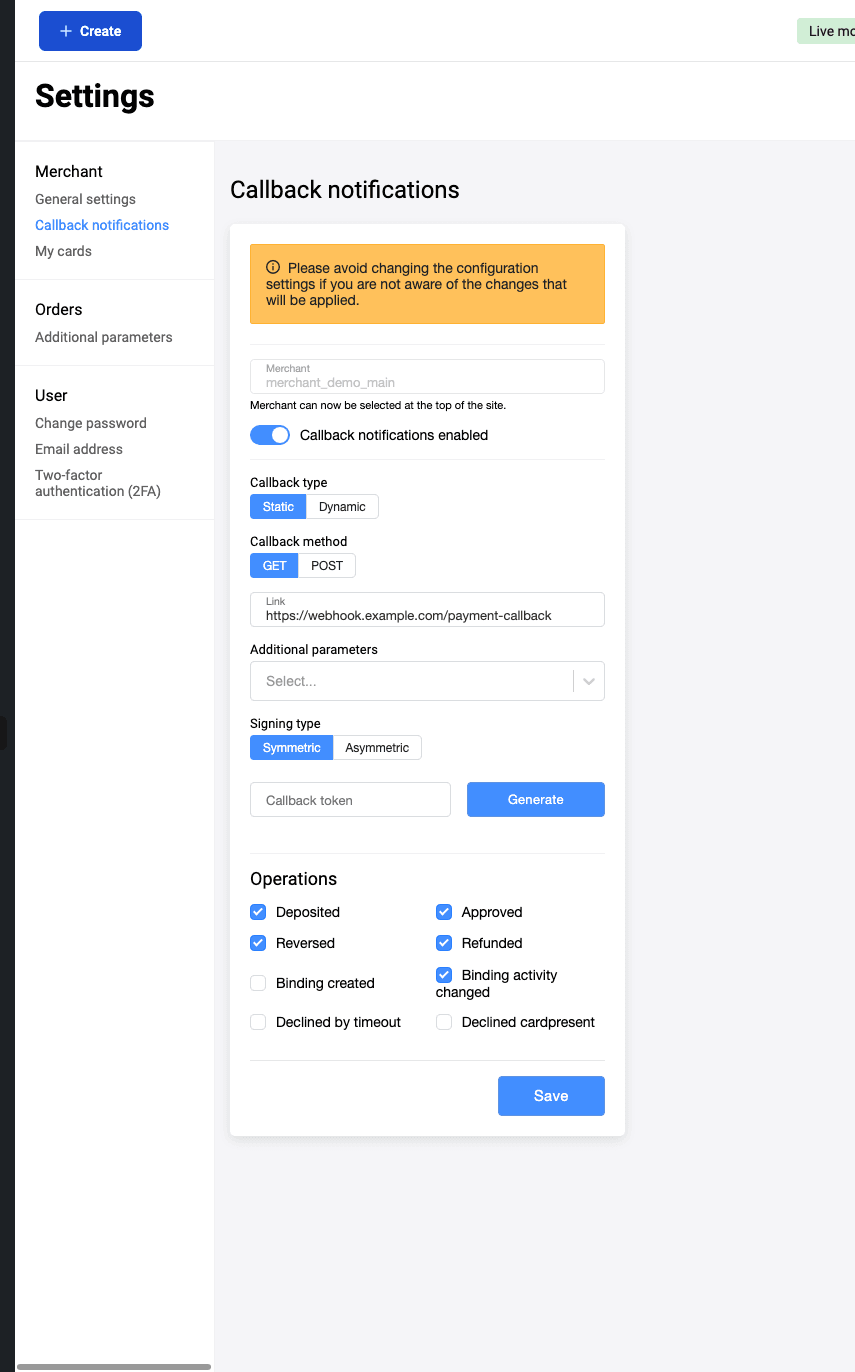
Callback type
If the Merchant has already configured the callback type as Dynamic, both options in the Signing Type field will not be available for selection, they will be non-clickable.

Callback method
Choose one of the two suggested methods: GET or POST.
Link
Enter the URL (for example, https://test.com) to which notifications will be sent.
It is allowed to specify multiple links (separated by commas and without spaces).
Additional parameters
Enter the parameters to be passed to the callback, separated by commas.
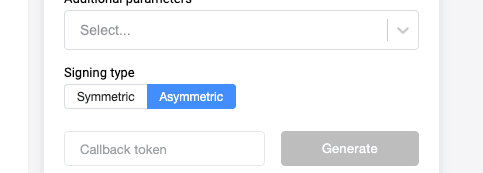
Signing type
Select one of the signing types: Symmetric or Asymmetric.
If the Symmetric signing type is selected, it is possible to generate a callback token. Also, if you select the Symmetric signing type, manual token entry is available.
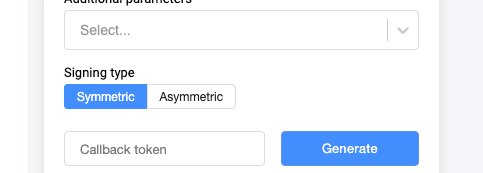
If Asymmetric signing type is selected, the Generate button will be inactive. The key for Asymmetric signing can be obtained from the support team.
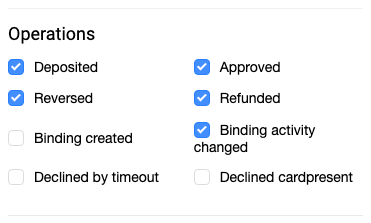
Operations
Select the events for which a callback notification will be sent. The notification will be sent both when the operation is successful and in case of an error.
Changing the password
To change the password to Personal Area, complete the following steps.
- Log in to Personal Area.
- In the navigation bar to the left, go to Settings by clicking
 .
. - On the page that appears, select Change password. The page will look as follows.
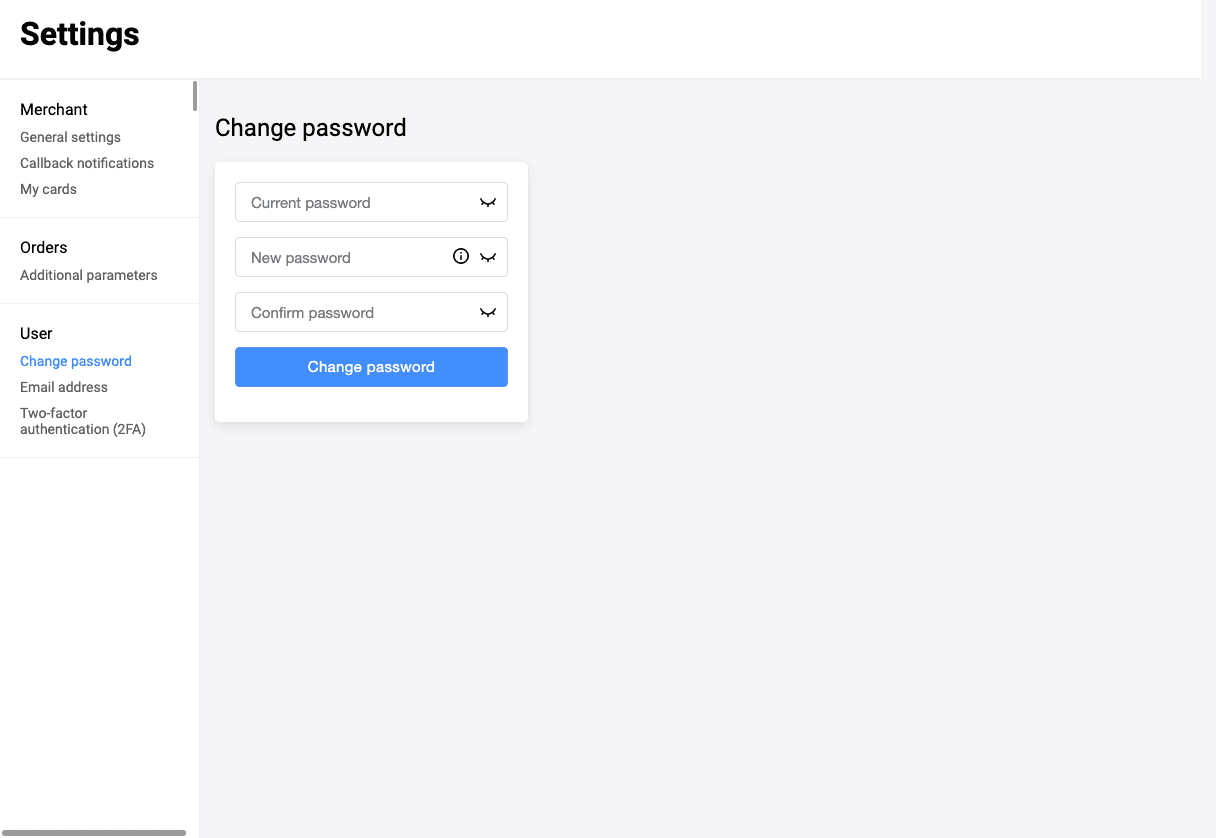
- Enter your current password in Current password field.
- Enter a new password in New password and Confirm password fields.
The password must meet the following requirements:
- The password must not contain the name of the store or the login of any of the users created for the merchant (using logins in different leTTER CaSe as passwords is also not allowed).
-
Password must contain the following characters:
- uppercase Latin characters (A-Z)
- lowercase Latin characters (a-z)
- digits (0-9)
- special characters (! "#;:? \ * () + = /\ < > , . [ ] { } );
The password must be at least 8 characters long.
Click on the Change password button.
Email for password recovery
To be able to recover the password for your Personal Area, enter your email address:
- Log in to Personal Area.
- In the navigation bar to the left, go to Settings by clicking .
- In Email address section, specify the email address you want to use for password recovery.
- Click on the Save button.
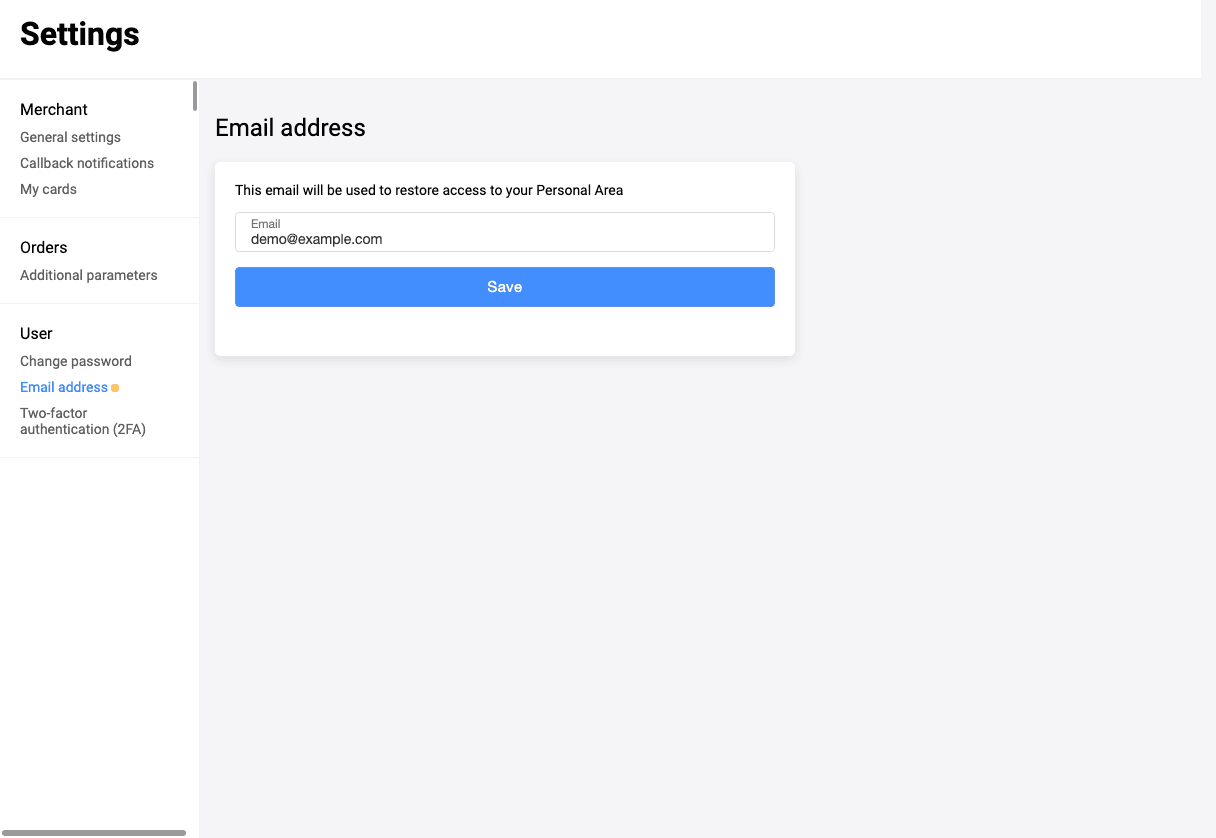
The confirmation email will be sent to the specified email address. After the email address is confirmed, editing the email address via this page becomes disabled. If you need to change the email address once again, contact the support team.
Two-factor authentication (2FA)
You can set up two-factor authentication to provide additional level of security that guarantees that only you can have access to your Personal Area. In this case, at the logon to the Personal Area, you should enter not only login and password, but also the authentication code generated by Google Authenticator application or sent to your email address (depending on the authentication method configured).
To set up two-factor authentication, in the navigation bar to the left, go to Settings > Two-factor authentication (2FA). The page provides two options for setting up two-factor authentication:
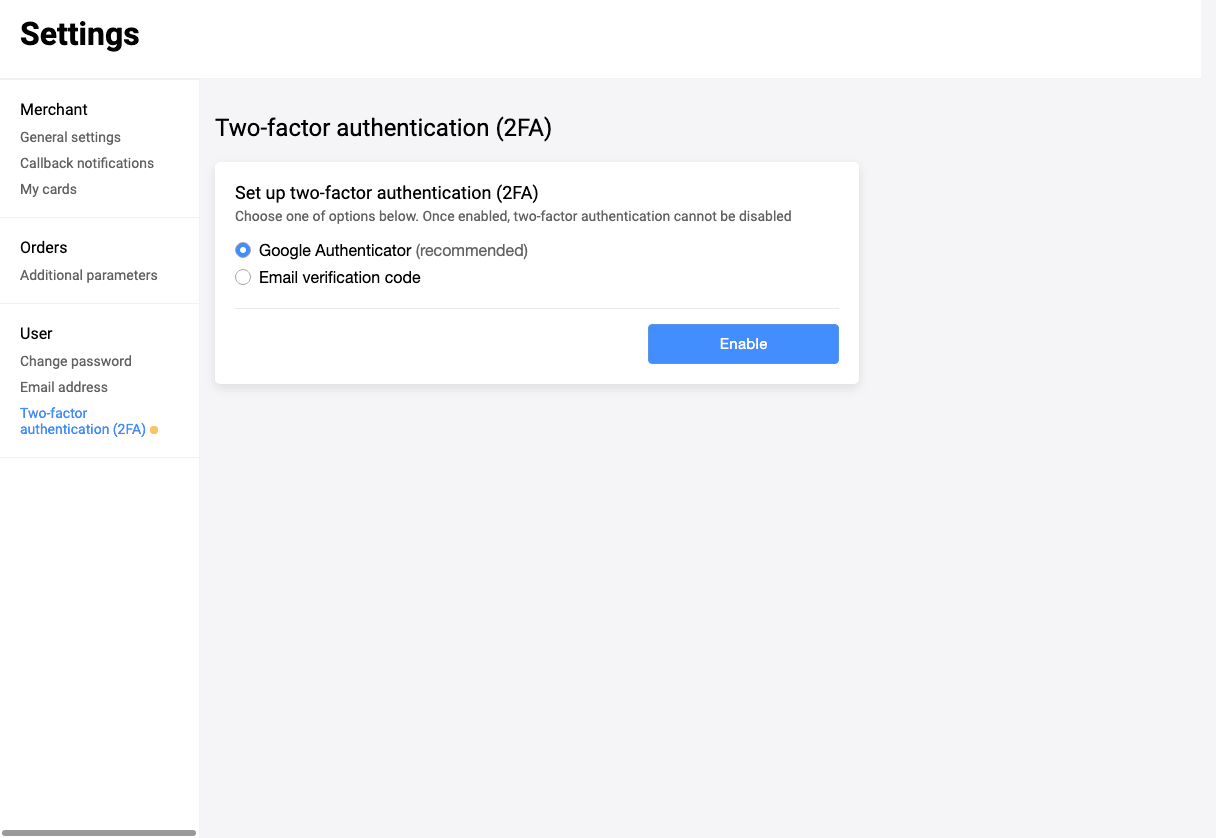
Google Authenticator (recommended)
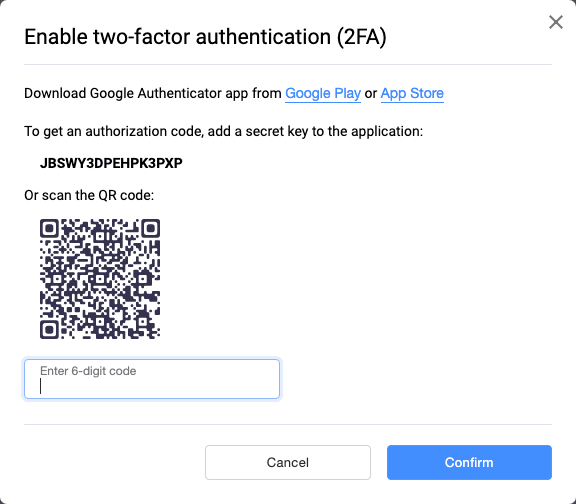
- In the provided list of options select Google Authenticator (recommended) and click on the Enable button.
- A form appears where you have to confirm your password:
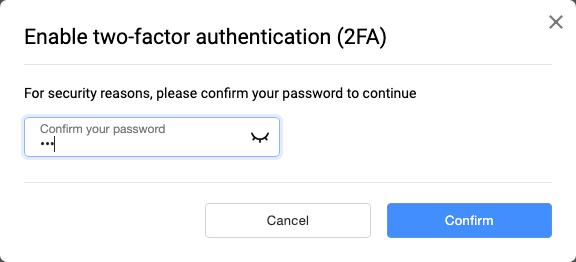
- Download and open Google Authenticator application on your device. Enter a secret key or scan the QR-code to add your account to Google Authenticator application. The application generates a code. Enter the generated code into the Enter 6-digit code field.
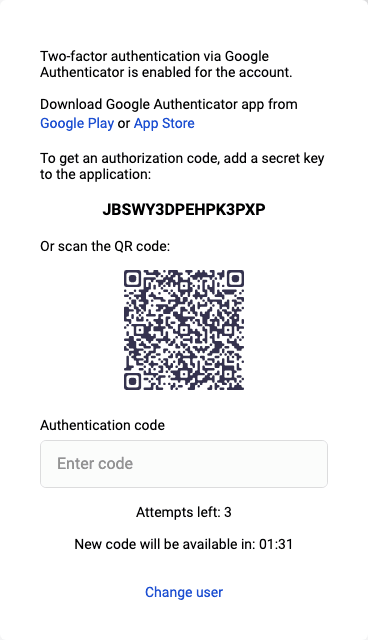
- Once two-factor authentication via Google Authenticator is enabled, at the next logons to your Personal Area, you are asked to enter Google Authenticator code:
Email verification code
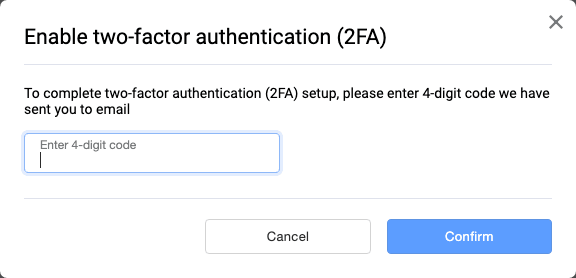
- In the provided list of options select Email verification code and click on the Enable button.
- In case your email address is not set in the settings and not confirmed, first you need to do it. Otherwise, please proceed.
- A form appears where you have to confirm your password:
- To complete two-factor authentication setup, enter 4-digit code sent to your email address:
- Once two-factor authentication via Email is enabled, at the next logons to your Personal Area, you are asked to enter 4-digit code sent to your e-mail address.
Dashboard
To display the Dashboard page, click on the ![]() icon in the navigation bar to the left.
icon in the navigation bar to the left.
The page contains information about transactions:
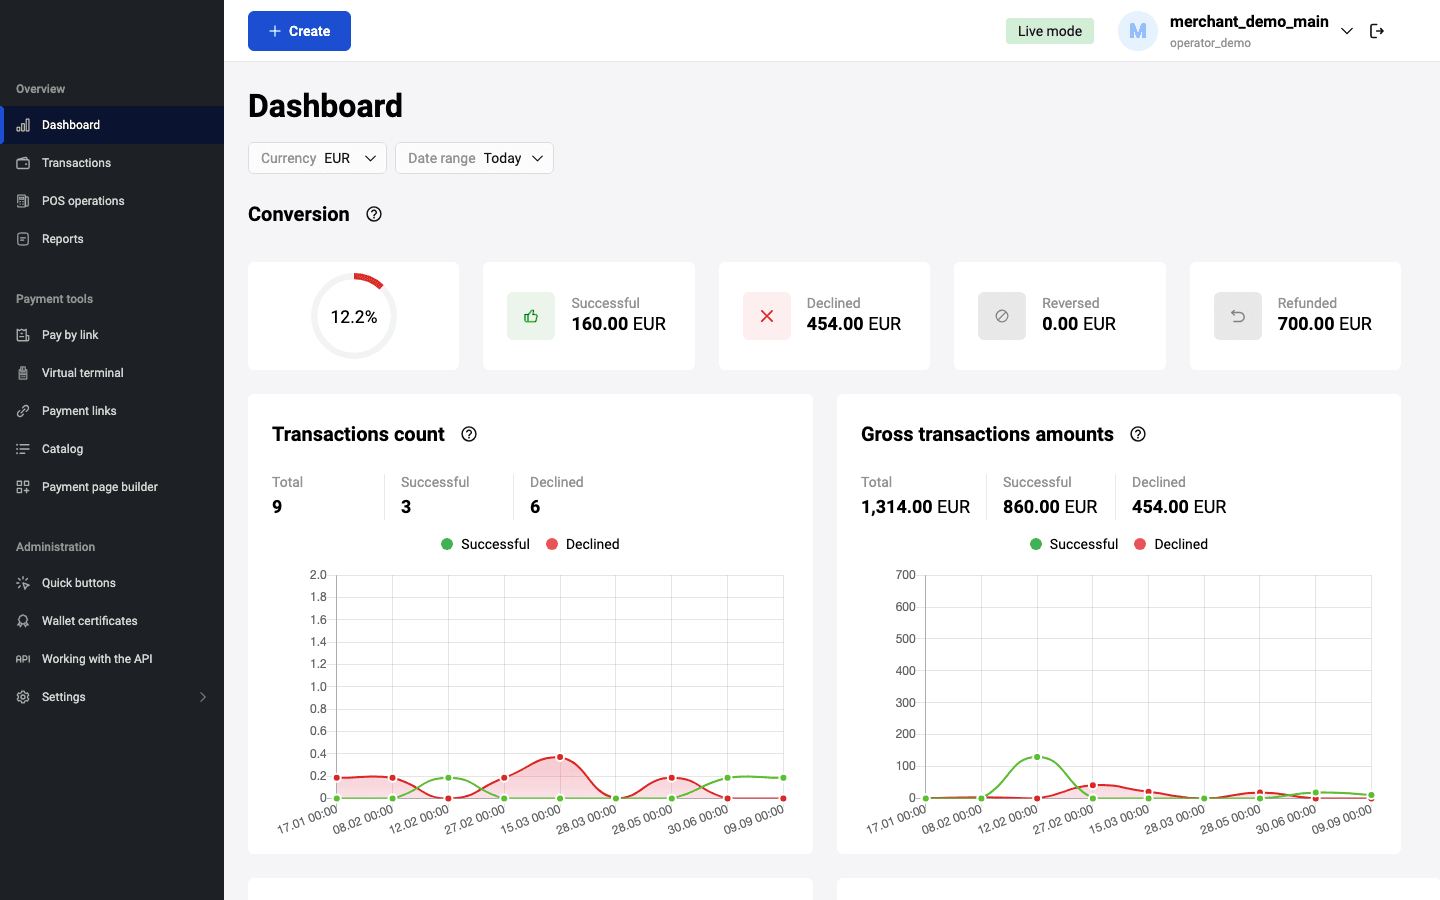
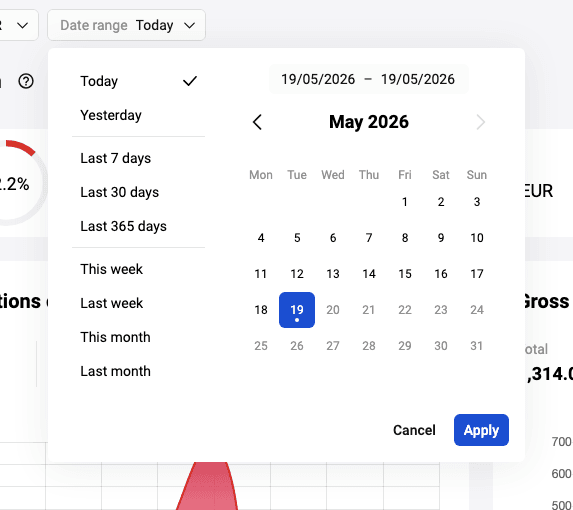
The menu at the top allows you to select the period for which the payments information will be displayed. Select one of the period values or select the dates from the calendar.
The Conversion graph displays the percentage of successful transactions to the total number of transactions.
The Decline codes graph shows the major causes of order processing errors.
![]()
The Transactions count graph displays information about transactions for the selected period.
![]()
The counters on the chart are the following:
- Total – the total number of transactions
- Successful – the number of successful transactions
- Declined – the number of transactions during the processing of which an error occurred
The Gross transactions amounts graph displays information about amounts of successful and declined transactions.
![]()
The Net transactions amounts graph displays information about amounts of successful vs. refunded/reversed transactions.
![]()
Invoices
You can issue a payment invoice to the customer for goods or services via email. To do this, use the Invoices section of the Personal Area. After issuing the invoice, the customer receives an email and follows the link in it to the payment page.
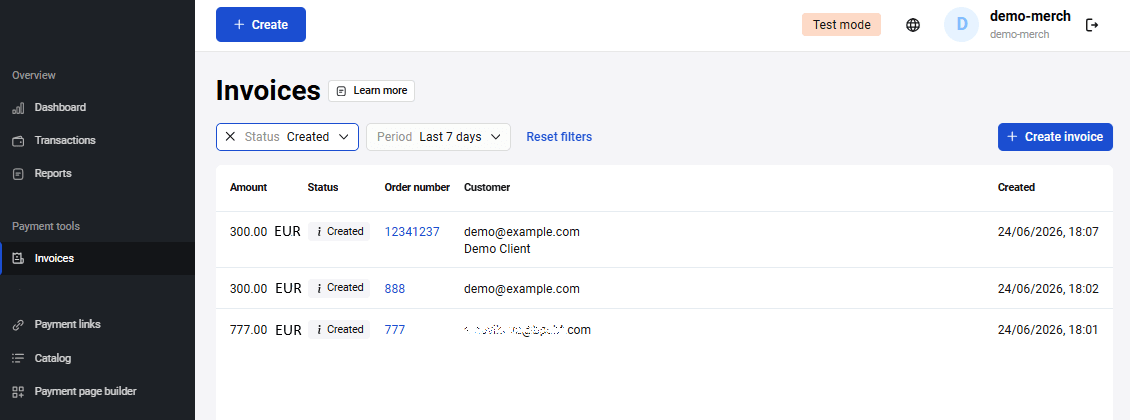
On this page you can do the following:
- send invoice to the customer
- perform test payment
- find invoices by filter
- view invoice information
- cancel invoice
- duplicate invoice
- resend invoice
Sending invoice
To issue an invoice to a customer and send them a link to the payment page by email, go to the Invoices section of the Personal Area and click Create invoice.
You can also do this by clicking the Create button at the top of the Personal Area and selecting Invoice.

The page for entering invoice parameters will be displayed:
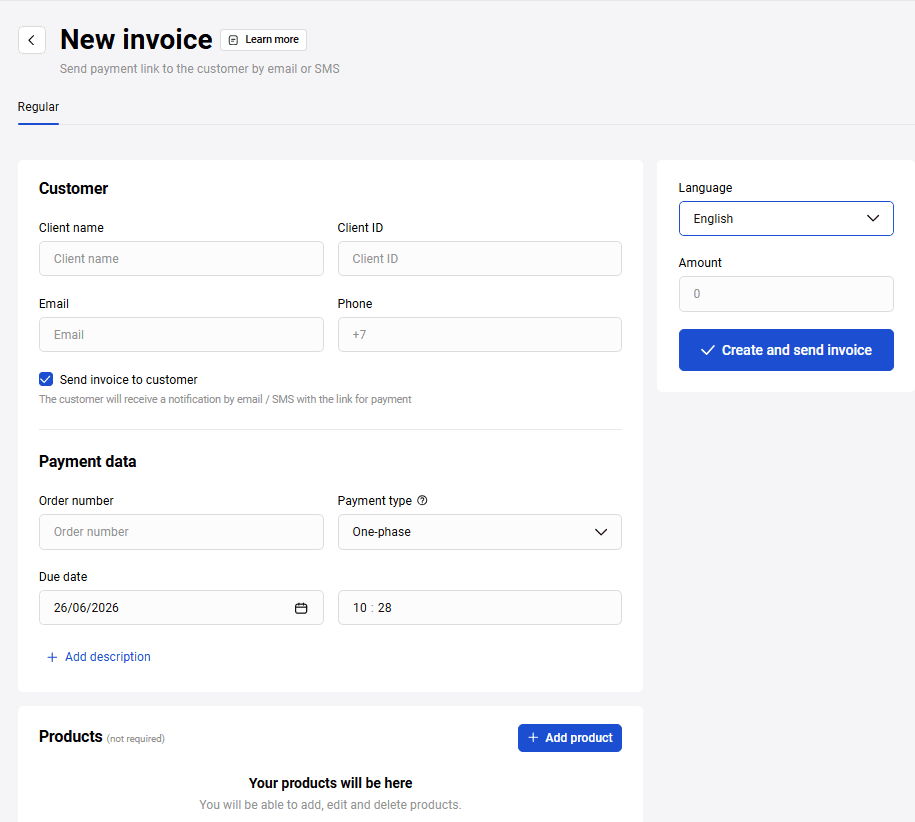
Set the parameters according to the table below.
| Parameter | Description |
|---|---|
| Client name | Customer's last name, first name, and patronymic. The data entered in this field is displayed in the email containing the link to the payment page. |
| Client ID | Client number in the store system (optional). |
| Email address to which the payment link will be sent. (It is necessary to specify either email or phone number.) | |
| Phone | Customer's phone number. (It is necessary to specify either email or phone number.) |
| Send invoice to customer | If this check box is selected, the customer will receive a notification by email / SMS with the link for payment. |
| Order number | Order number in the merchant's system. |
| Payment type | Choose one of two options:
|
| Due date | Specify the date and time until which the invoice can be paid. After this period expires, it will be impossible to pay the issued invoice. |
| Payment description | Free-form payment description. |
| Amount | Specify the payment amount. If the order contains a pre-filled shopping cart, this field is filled automatically. |
Click the Create and send invoice button. If sent successfully, a link to the payment form will be displayed below:
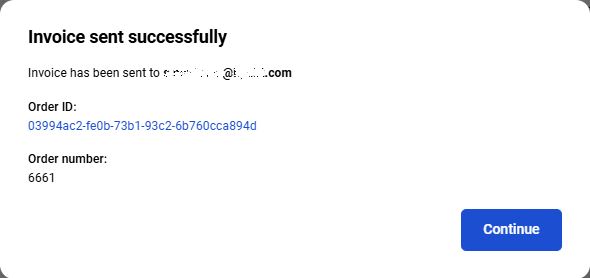
Click Continue to open the invoice information page.
Adding a shopping cart to invoice
When creating an invoice, you can specify a shopping cart for the order. The Products section is located below the invoice creation form:

-
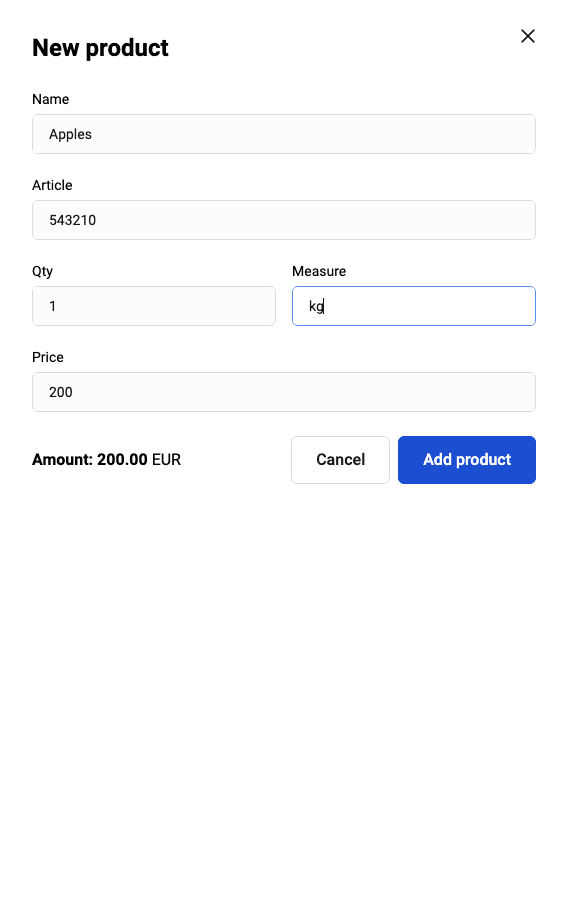
To add a product to the shopping cart, click on the Add product button and select New product.

A form with the parameters of the product being added will be displayed.
-
Fill in the required fields according to the table below.
Field Description Name Product/service name. Mandatory field. Article The vendor code of the product. Mandatory field. Qty The number of units of the product. Mandatory field. Measure Units of measurement, for example: L – liters, pcs. – pieces. Mandatory field. Price Price of one product unit. Mandatory field. Amount Total amount for all units of one product item. Calculated automatically when filling in the Price and Qty fields. If you have configured fiscalization, fill in (optionally) the following fields (the set of values may slightly differ depending on the FFD version):
Field Description Payment subject Payment subject, available values: - Product;
- Excisable product;
- Work;
- Service;
- Betting gambling;
- Gambling winnings;
- Lottery ticket;
- Winning a lottery;
- Providing RIDs;
- Payment;
- Agency fee;
- Compound subject of payment;
- Other subject of payment;
- Property right;
- Non-operating gain;
- Insurance premiums;
- Sales tax;
- Resort fee;
- Excisable goods subject to labeling by identification means that does not have a marking code;
- Excisable goods subject to labeling by means of identification, having a marking code;
- Product to be labeled by means of identification that does not have a marking code (except for excisable goods);
- Product to be labeled by means of identification with a marking code (except for excisable goods).
Payment method Payment method. Possible values: - Full prepayment;
- Part prepayment;
- Advance payment;
- Full payment;
- Part payment;
- Transfer on credit;
- Credit payment.
Commodity nomenclature code Commodity nomenclature code. Tax type VAT rate, the following values are available: - No VAT;
- VAT at 0% rate;
- VAT at 10% rate;
- VAT at calculated rate 10/110;
- VAT at 20% rate;
- VAT at calculated rate 20/120
- VAT at 5% rate;
- VAT at calculated rate 5/105;
- VAT at 7% rate;
- VAT at calculated rate 7/107;
- VAT at 22% rate;
- VAT at calculated rate 22/122.
Tax amount Tax amount calculated by the seller. Specified in minimum currency units. Excise Excise amount. Country code 3-digit country code. Declaration number Customs declaration number. -
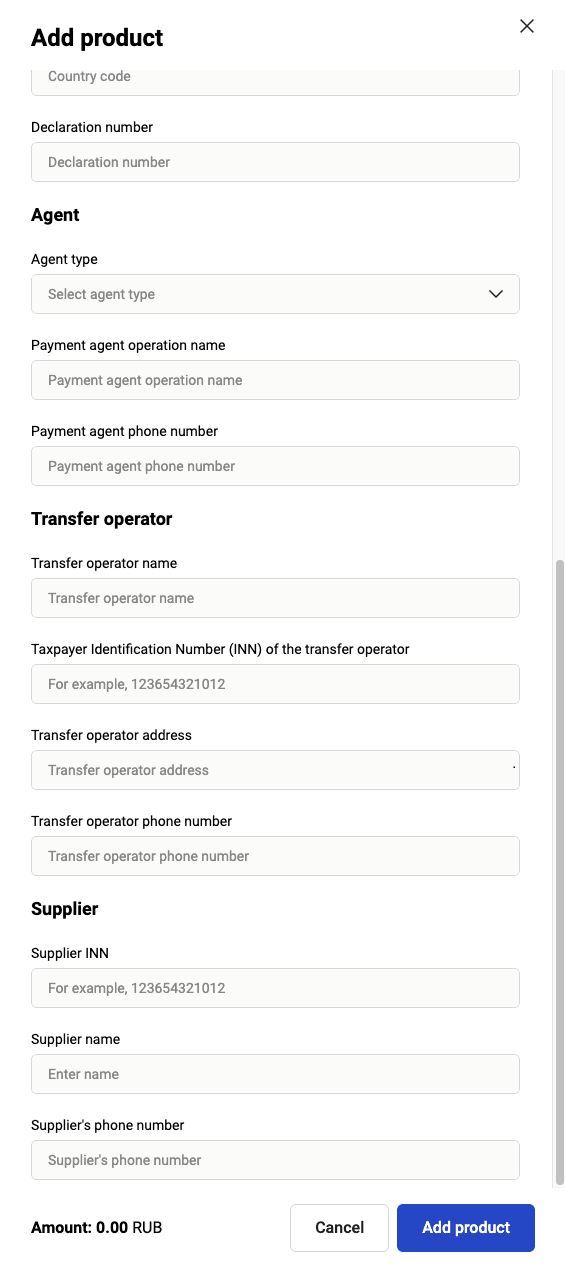
If the Sale of goods under an agency agreement option is selected in fiscalization settings, fill in (optionally) the fields with additional OFD parameters that are displayed in the More parameters section.
Field Description Agent type Agent type, available values: - Bank paying agent;
- Bank paying subagent;
- Paying agent;
- Paying subagent;
- Attorney;
- Commission agent;
- Another.
Payment agent operation name Payment agent transaction name. Payment agent phone number Payment agent phone number. Name of the transfer operator Transfer operator name. Taxpayer identification number (INN) of the transfer operator Transfer operator INN. It must be a valid INN consisting of 10 or 12 digits. Address of the transfer operator Transfer operator address. Transfer operator phone number Transfer operator phone number. Supplier INN Supplier INN. It must be a valid INN consisting of 10 or 12 digits. Supplier name Supplier name. Supplier's phone number Supplier phone number. Click Add product.
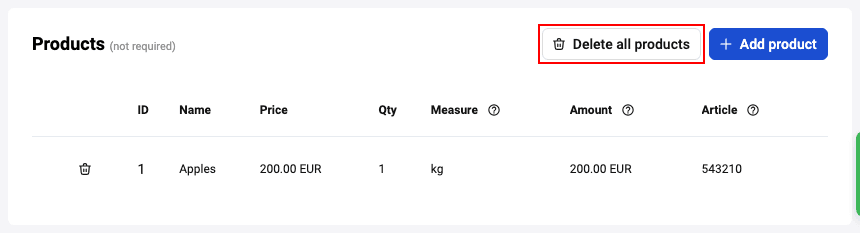
Repeat the required steps for each item in the shopping cart. If you need to delete the added product, click
 and confirm the action. If you want to delete the cart, click on the Delete all products button and confirm the action.
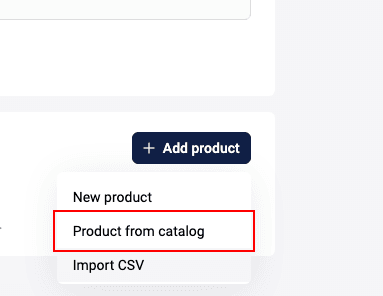
You can add items from the catalog, if you have previousy set up the product catalog. Click Add product, select Product from catalog, and then select the item in the opened window.
After adding a product item, you can edit it. To do this, click the item line and change the values in the editing form.
Having added all items to the shopping cart, issue an invoice to the customer.
Importing a CSV file
You can register an order (invoice) with a shopping cart and this cart can be populated automatically from a CSV file. To upload cart automatically, click on the Add product button and select Import CSV. In the window that opens, select the file to be uploaded on your device.
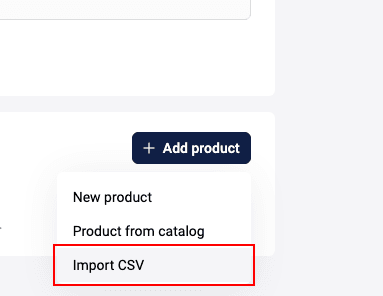
You can upload two types of files that can contain:
- only cart data (ORDER_BUNDLE)
- cart data (ORDER_BUNDLE) and order data (ORDER_PARAMS)
Please note, there are no mandatory fields and only certain fields can be mapped.
Possible cart data fields:
-
ItemCode— product code in the merchant system. -
Price— price per unit of a product item. -
Amount— payment amount in minimum currency units. Up to 12 symbols. -
Measure— units of measurement, e.g.: l — liters, pcs. — pieces. -
Quantity— the total number of product items of one PositionId and its measure. The description of its attributes is presented below. Name— name or description of the item or service.-
TaxType— VAT rate, the following values are allowed:- No VAT;
- 0% VAT;
- VAT at 10% rate;
- VAT at the estimated rate of 10/110;
- VAT at 20% rate;
- VAT at the estimated rate of 20/120;
- VAT at 5% rate;
- VAT at the estimated rate of 5/105;
- VAT at 7% rate;
- VAT at the estimated rate of 7/107; VAT at 22% rate;
- VAT at the estimated rate of 22/122
TaxSum — tax amount calculated by the merchant. The amount is specified in minor denomination.
PaymentSubject — sign of the subject of settlement, available values:
-
1— commodity; -
2— excisable goods; -
3— work; -
4— service; -
5— gambling bet; -
6— gambling winnings; -
7— lottery ticket; -
8— lottery winnings; -
9— provision of rd; -
10— payment; -
11— agency fee; -
12— composite item of settlement; -
13— other subject of settlement; -
14— property right; -
15— non-operating income; -
16— insurance premiums; -
17— trade levy; -
18— resort fee; -
19— pledge.
PaymentMethod — payment type, the available values are:
-
1— full prepayment; -
2— partial prepayment; -
3— advance payment; -
4— full payment; -
5— partial payment with further installment payments; -
6— no payment with further installment payments; -
7— payment with further installment payments.
CountryCode — two-letter country code.
Excise — the amount of excise tax — decimal number with two digits after the decimal point.
DeclarationNumber — the number of customs declaration.
Possible order data fields:
-
OrderNumber— order number (ID) in the merchant's system, must be unique for each merchant. -
TotalAmount— order amount plus fee, if any. -
Merchant— merchant login in the payment gateway. -
Currency— ISO 4217 encoded currency key. -
Language— ISO 639-1 encoded language key. If the language is not specified, the default language specified in the store settings is used. -
AuthType— Authentication type, possible values:0—PURCHASE,1—PRE_AUTH. -
Email— customer's email address. -
Phone— customer's phone number. -
Full name— customer's full name. -
INN— TIN. -
Passport— passport data. -
Sender— sender's email address. -
Description— Order description. -
ClientId— Customer number (ID) in the merchant's system — up to 255 characters. -
Payment period— set the date and time before the order is paid. For example, 5D– 5 days, 22H – 22 hours, 10M – 10 minutes.
Example with cart data:
ItemCode,Price,Amount,Measure,Quantity,Name
1,10,20,pieces,2,apples
Example with cart and order data:
Important: To ensure proper file processing, please make sure to avoid including commas within field values. Commas should only be used to separate fields and their corresponding values.
An example of incorrect field input in the file:
ItemCode,Name,Amount,Quantity,Measure,Price
123,apples,red,20000,1,kg,20000
Example of correct field input in the file:
ItemCode,Name,Amount,Quantity,Measure,Price
123,apples red,20000,1,kg,20000
Making a test transaction
You can independently test payment process on behalf of customer. To do this:
-
Generate invoice for customer.
-
Click Continue to open invoice details. Open payment page by following link at top of page.

Select payment method. When paying by card, enter data of one of test cards.
Check Save this card for future payments if you want to store the credential: in this case entering card data will not be required next time.
Click Pay. To confirm operation use 3–D Secure code specified for test card.
Final page
After successfull payment, the client can optionally be redirected to the Final page. This page contains data about the payment and a link back to the store.
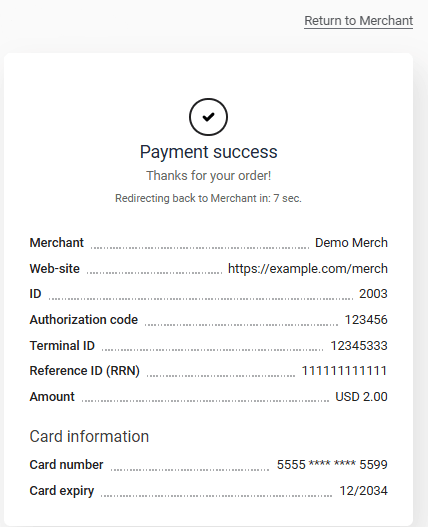
The table below describes the data displayed on the final page.
| Field | Description |
|---|---|
| Merchant | Merchant’s login. |
| Web-site | Merchant’s website address. |
| ID | Automatically generated order number in the merchant’s system. |
| Authorization code | International payment system authorization code (6 symbols). |
| Terminal ID | Terminal identifier in the system that processes the payment. |
| Reference ID (RRN) | Reference number of the payment authorization that has been assigned to it upon its registration. |
| Amount | Payment amount. |
| Description | Description of the payment. |
| Card information | Masked number and expiration date of the card used for payment. |
For the client to go back to the store, they would click the Return to Merchant link.
You can enable or disable showing the final page using the Show final page check box on the General settings page of your Personal Area. Read more here.
Invoice search by filter
At the top of Invoices page filters are located which allow you to find an invoice. To set search criteria, select needed values in the corresponding dropdown list.
Following criteria are available:
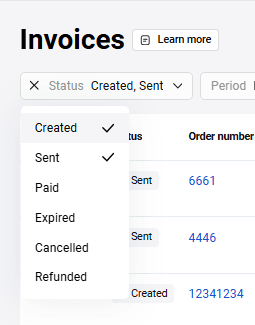
-
Status — Invoice status. Following statuses are available (multiple selection):
-
Created. Invoice is issued but not yet sent to the customer.
-
Sent. Invoice is successfully sent to the customer through any channel (email, SMS) but not yet paid.
-
Paid. Invoice is paid.
-
Expired. Invoice payment period has expired. The corresponding transaction is declined.
-
Cancelled. Invoice is cancelled.
- Refunded. Partial refund was made.
-
Created. Invoice is issued but not yet sent to the customer.
- Period — Specify time interval. You can select period (for example, "Today", "This week") or set time interval by selecting start and end dates in calendar.
Invoice actions
View invoice information
To view invoice details, open Invoices page and click on needed invoice row.
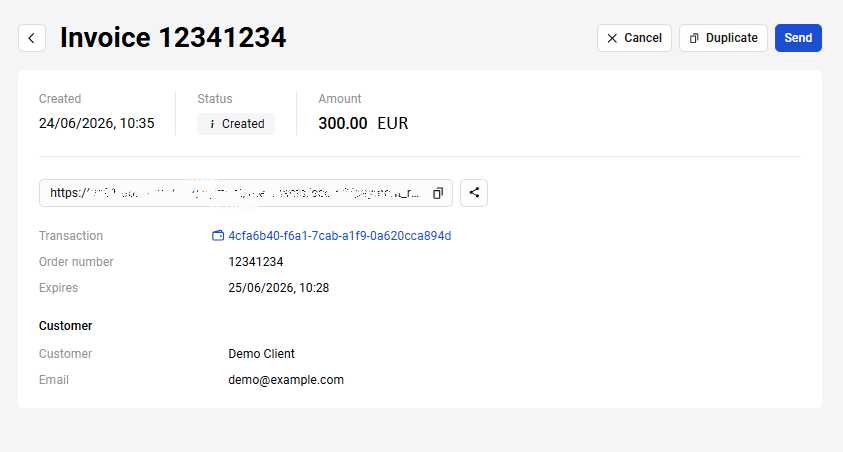
The following information is displayed on the invoice details page:
- Creation date, status and invoice amount
- Link to the payment page sent to the customer
- Transaction — link to the transaction details page related to this invoice
- Order number — order number in the store system
- Sent — date and time when the invoice was sent to the customer
- Expires — date before which the invoice must be paid
- Customer — customer's first name, last name, and middle name
- Email - customer's email for sending invoice
Buttons for cancelling, duplicating and resending invoice are also available. These actions are described below.
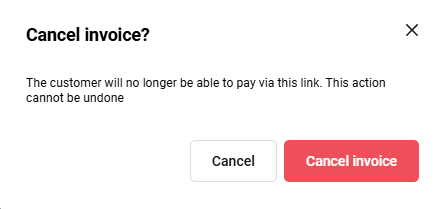
Invoice cancellation
To cancel not yet paid invoice, on the invoice details page, click Cancel button. In the opened window, confirm cancellation.
Invoice duplication
You can duplicate invoice to create the same or similar invoice without entering all data again. To do this:
- On the invoice details page, click Duplicate button.
- A page for creating new invoice will open where all fields will already be filled with original invoice data. The Order number field will be empty.
- Enter new order number. Change other data if necessary.
- Click Create and send invoice.
As a result, a new invoice will be created and sent to the customer.
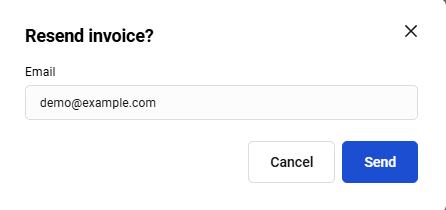
Invoice resending
To resend an already created invoice, on the invoice details page, click Resend button. In the opened window, confirm invoice resending.
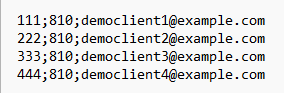
Batch sending invoices by e-mail
If you have an appropriate permission, you can send multiple invoices at once to the customers by uploading a CSV file with invoice data and e-mails. The file format is defined by a template that is configured by the support team.
The example of the file content (amount, currency code, e-mail):
Uploading a batch file
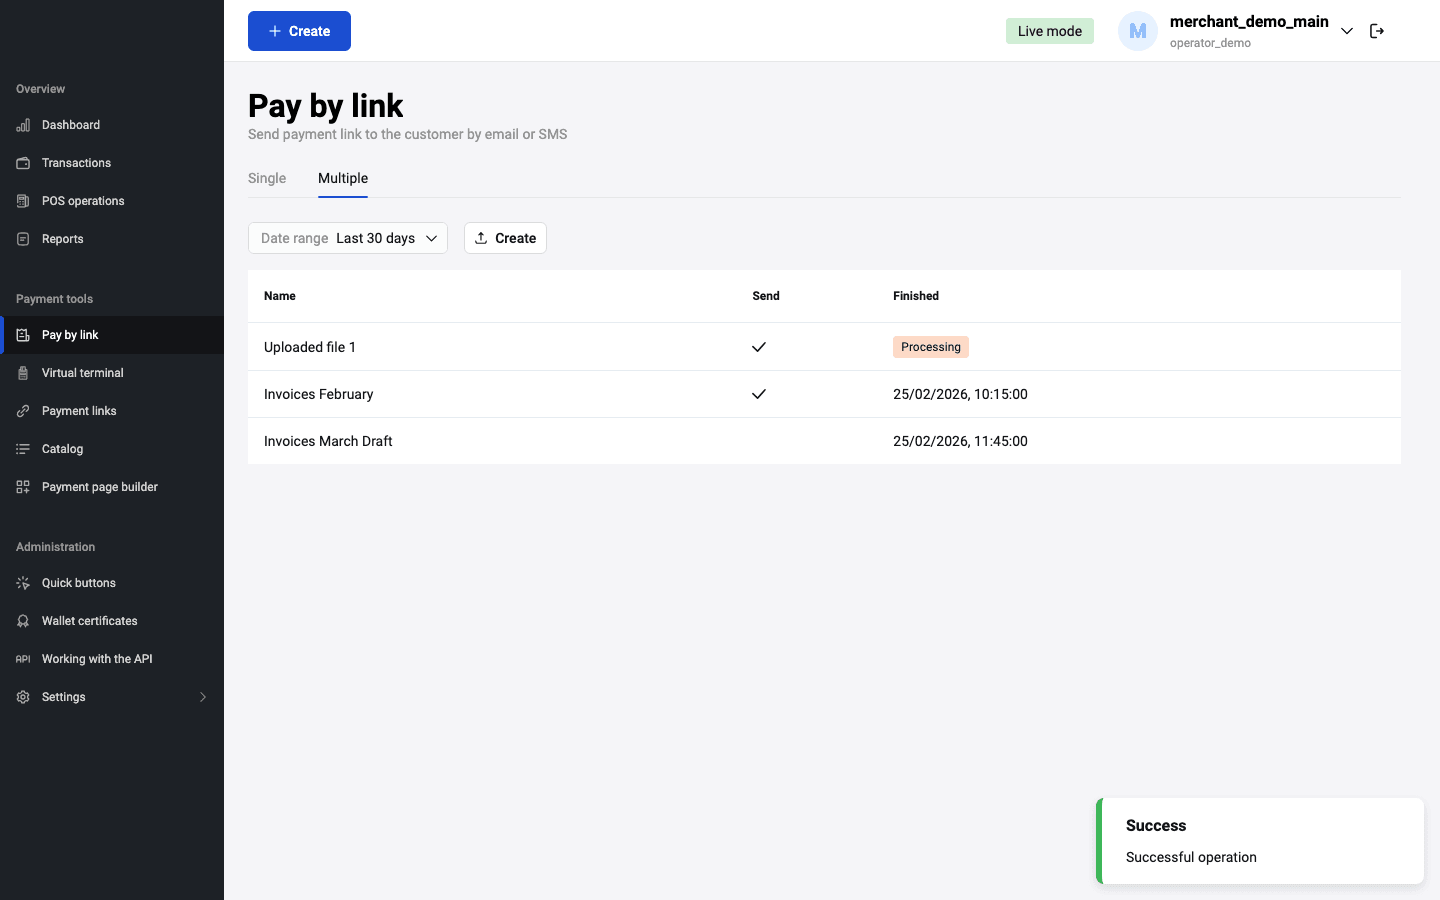
To upload a batch file, go to the Pay by Link section and open the Multiple tab. The page displays the list of already uploaded files (if they present).

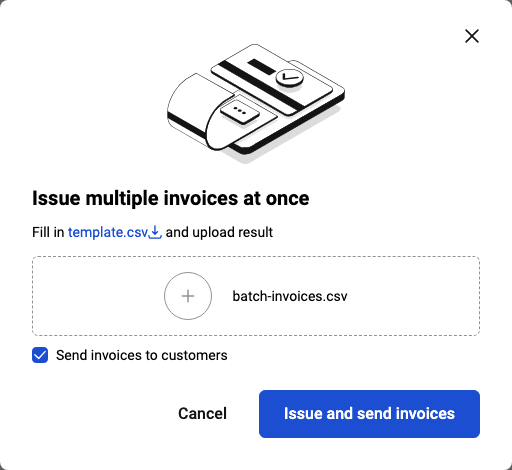
Click Create. In the opened dialog, you can download the template for the file creation. Download the template and fill it in with the required values.
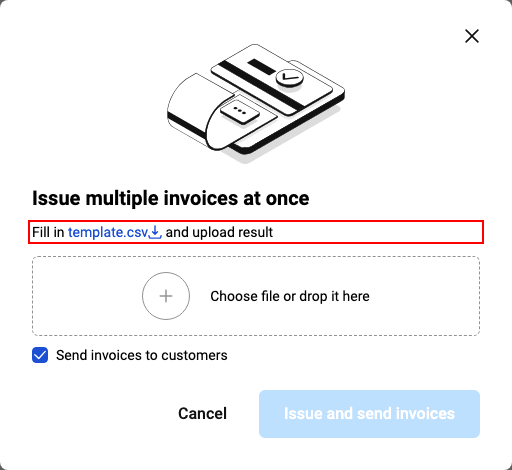
Choose the file or drag and drop it to the corresponding fields. If you want the payment links to be sent immediately to the customers, check the Send invoices to customers box, and then click Issue and send invoices. Otherwise, clear the Send invoices to customers box and click Issue invoices.
A new line with the uploaded file appears in the list of processed files. While the file is being generated, the "Processing" status is displayed in the Finished column. When the file is processed, this column displays the date and time when the file was processed. The Send column contains a checkmark if the payment links have been sent to the customers.
Viewing the details of the processed file
To view the content of the processed batch file, go to the Pay by link section, open the Multiple tab and click on the line of the uploaded file. A page opens with the details for each invoice.
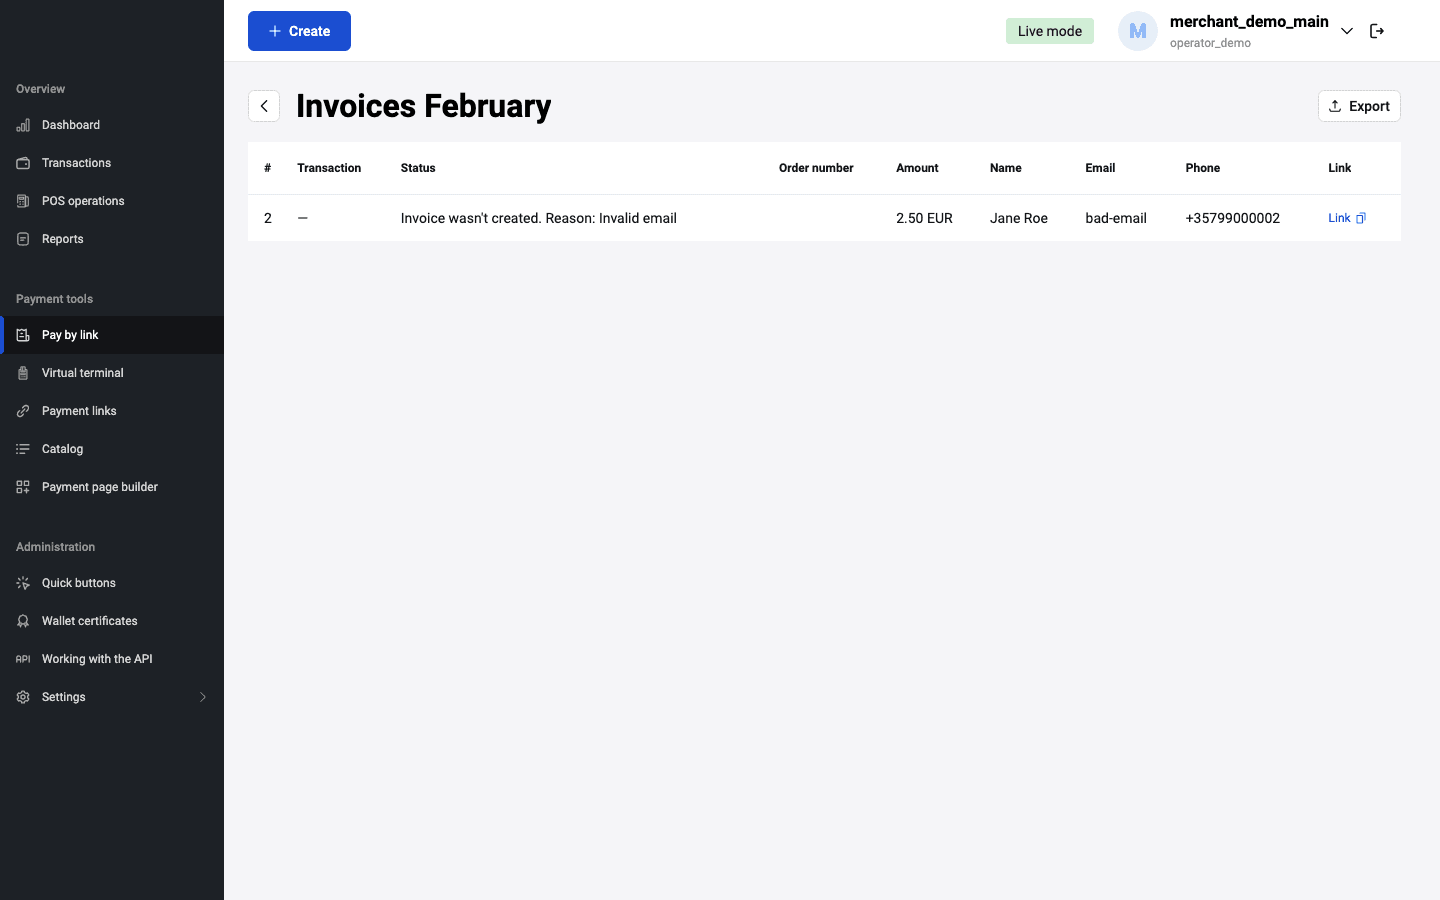
The table contains the following columns with details for each invoice:
- Transaction — link to the transaction for the invoice
- Status — status of sending the invoice to the customer
- Order number — order number of the transaction
- Amount — transaction amount
- Email — email for sending the invoice
- Phone — customer phone
- Link — link to the payment page
Export of the processed file
To export the processed file, open the file details and click Export. The file will be exported to CSV with the following fields:
-
itemId— mandatory field, a number of the processed line from the file -
successful— mandatory field, success of the string processing (true / false) -
reason— mandatory field, error description (if there is no errors, the field is empty) -
link— mandatory field, generated payment link -
email— e-mail address specified on the upload (if this parameter was present in the template)
The output file may contain other fields if they were present in the template.
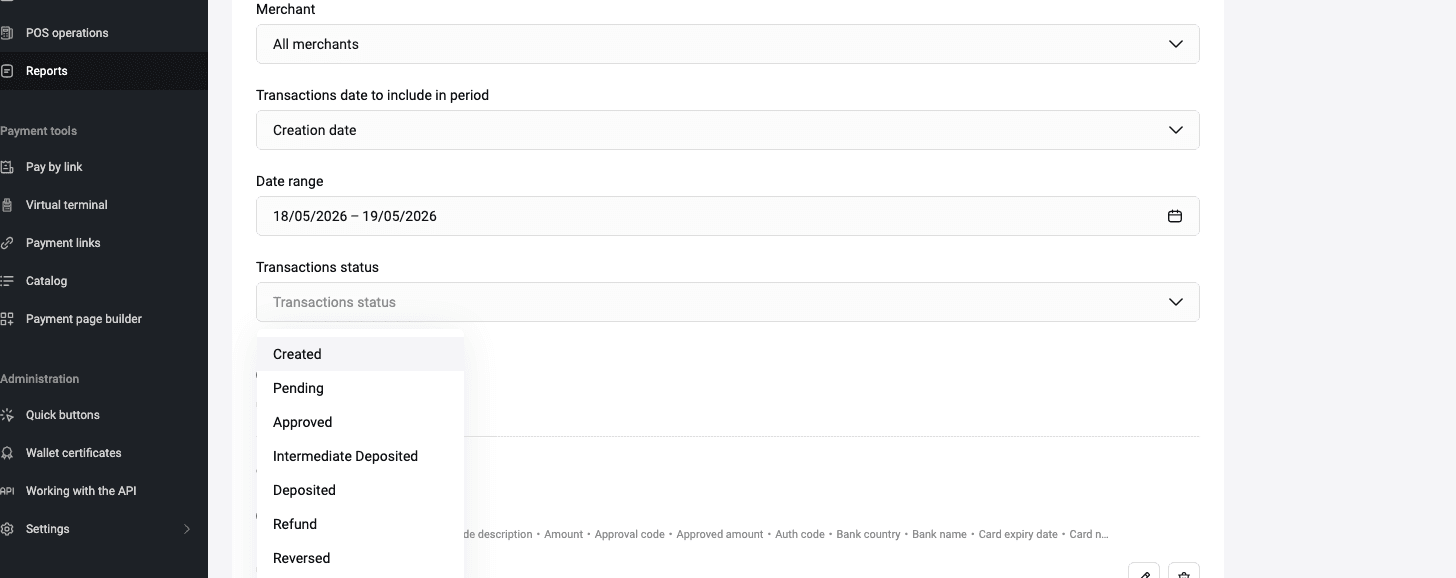
Reports
The Reports section is designed for generation of transaction reports based on a variety of parameters to choose from. To display the Reports page, click on the ![]() icon in the navigation bar to the left.
icon in the navigation bar to the left.
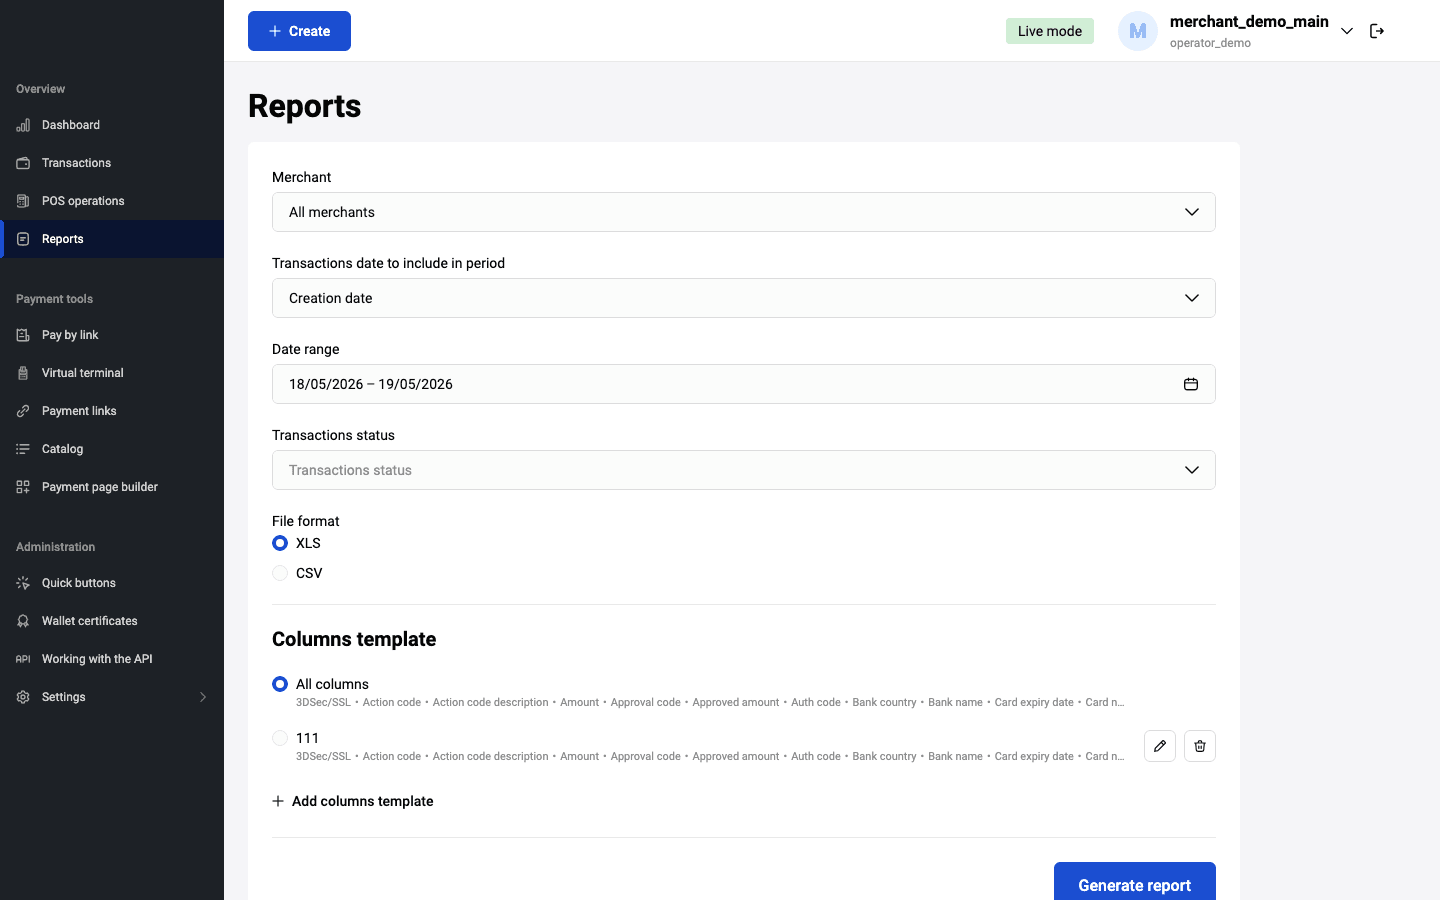
To filter the transactions in the report by merchant login, select one in the Merchant login list. Multiple logins may be available if you have permission to view transactions of other merchants or have child merchants.
The reports functionality provides several filters for report generation. You can select transactions by date:
- Order registration date;
- Refund date;
- Completion date;
- Order payment date;
- Reversal date;
Specify the required date range or enter a custom period by selecting dates in the calendar.

You can also filter transactions by status.
The report can be downloaded as an .xls or .csv file. Select the format by clicking the corresponding option.

Use the Add columns template button to create a field template for future use in the reports. After clicking the button, a column configuration form will appear. Enter the name of the template and check the boxes next to the columns that are to be displayed in the report. Some columns are interdependent for your convenience:
- Currency column is automatically selected when selecting any Amount (including Approved, Capturable, Commission, Deposited, Refunded, and Registered amount).
- Status column is automatically selected when selecting some dates (including Completion, Last refunded, and Reverse date).
After selecting the columns, click Create.
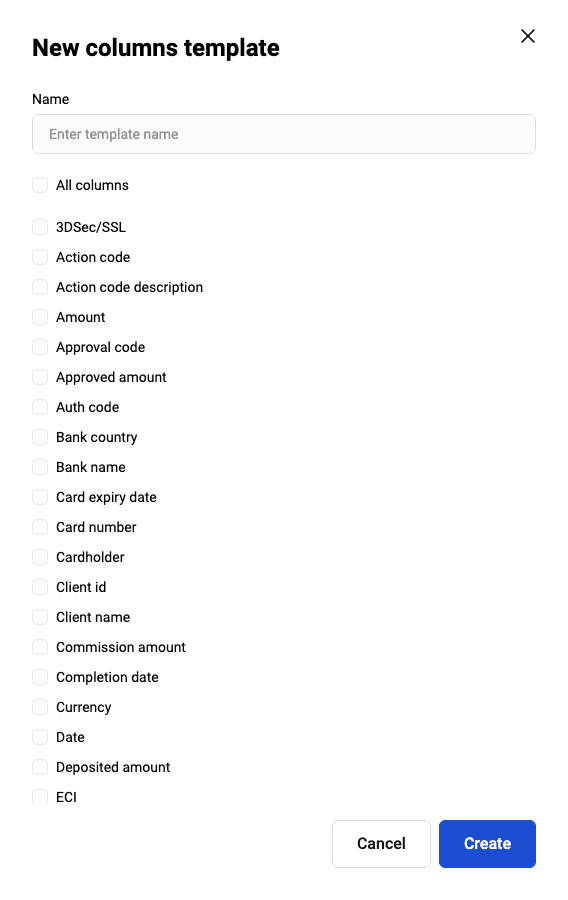
The saved template will be available for selection in the Columns Template list.
Having the parameters set, click the Generate report button. The report generation process will start. Depending on the settings of your browser, either the report file will be downloaded automatically or a dialog box will appear allowing you to choose a location where to save the report file.
Payment links
You can create a template for payment links that will redirect the customer to the payment page.
Create a payment link
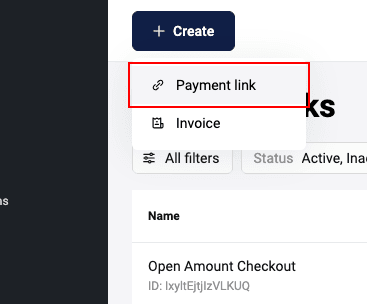
To create a link to a payment page, log in to your Personal Area, select the Payment links section in the left sidebar, and then click Create.

You can also create a payment link by clicking Create at the top of the page and selecting Payment link.
This will display a form for you to fill out:
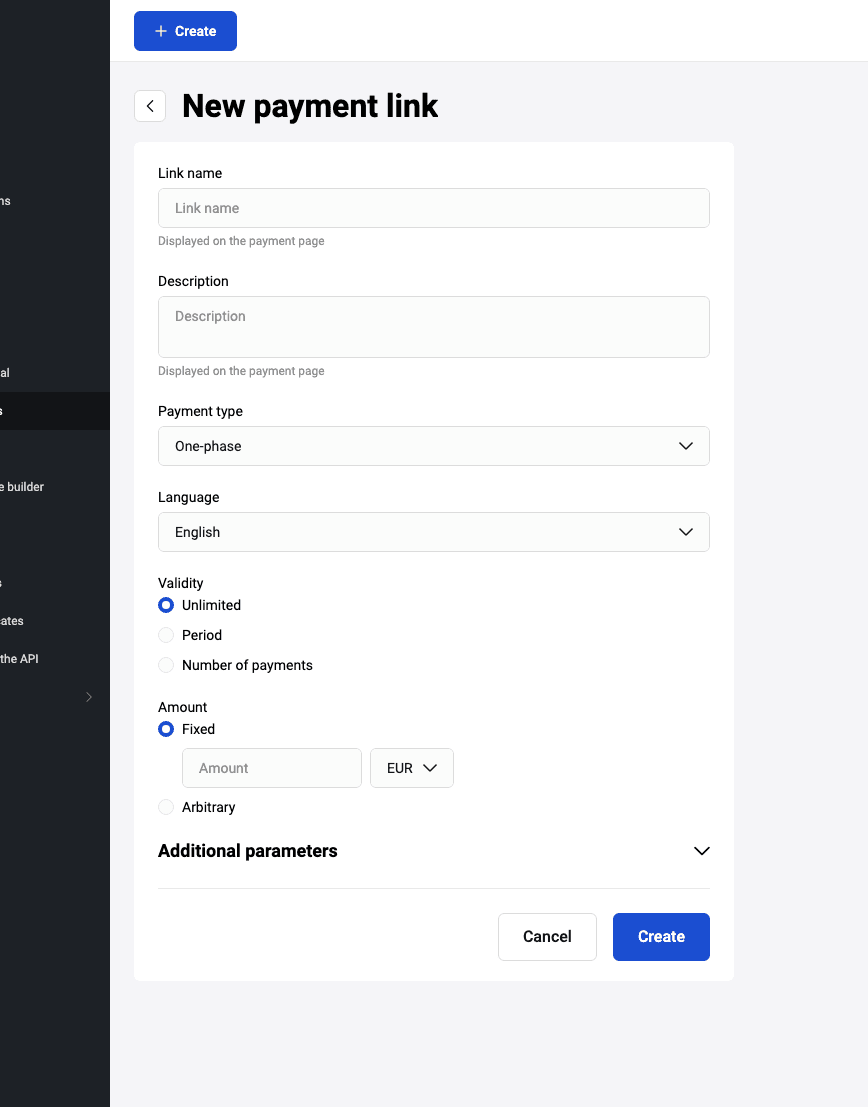
Fill in the required fields according to the table:
| Required | Field | Description |
|---|---|---|
| Mandatory | Link name | The name of the link, which is only available to the merchant. |
| Optional | Description | Description of the order, which is only visible to the merchant. |
| Optional | Language | Language of the payment page. |
| Mandatory | Amount | The default value is "100.00". If you click on "Arbitrary", the customer can specify the amount for payment on the payment page. |
| Optional | Currency | It is set by default, the value is set according to the merchant settings. |
| Optional | Validity | The default setting is one month from the current date. You can set a different interval: to do this, click on the date and select the required start and end dates of the link from the drop-down calendar. If the Indefinite field is enabled, this field is not available for editing. |
| Optional | Description | Description of the order, which will be displayed to the customer on the pre-payment page. |
Fill in additional parameters if needed.
| Field | Description |
|---|---|
| Address | Whether or not to display the delivery address field on the pre-payment page. |
| Whether or not to display the field for entering the customer's e-mail on the pre-payment page. | |
| Full name | Whether or not to display the field for entering the customer's name and surname on the pre-payment page. |
| Phone number | Whether or not to display the field for entering the customer's phone number on the pre-payment page. |
It is possible to add your own parameters. To do this, click +Add parameter and fill in the fields:
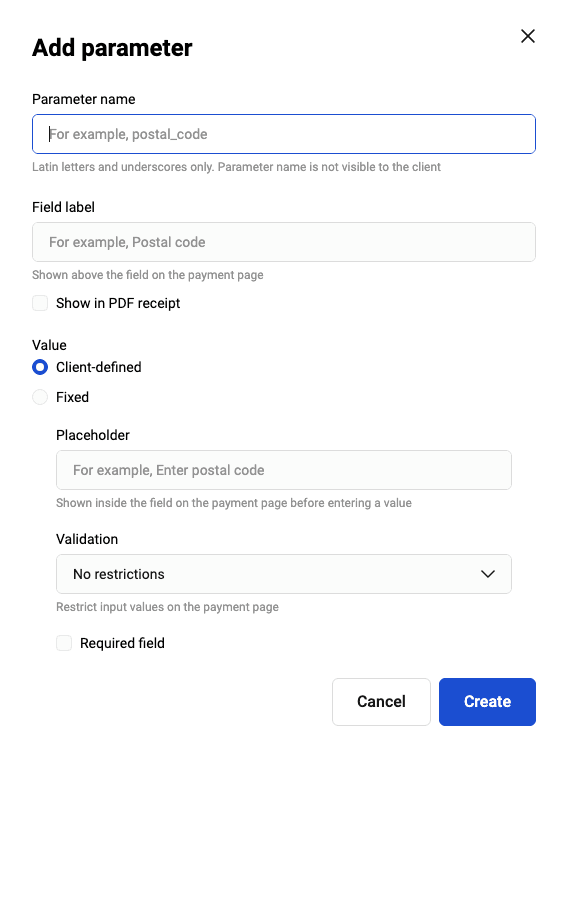
| Field | Description |
|---|---|
| Parameter name | The name of the parameter that the customer sees. |
| Field label | Required for the payment gateway. Only Latin characters and underscores are allowed. For example: size, items_count, etc. |
| Show in PDF receipt | A checkbox to be checked if the new parameter should be displayed in PDF receipt. |
| Value | Pre-filled data in the field. If you select Client-defined, specify the text to be shown inside the field in the Placeholder field, and select restrictions for the value in the Validation field (no restrictions, digits only, or a regular expression). If you select Fixed, specify the value, and the customer will not be able to change the value. |
| Required field | A checkbox to be checked if the new parameter is mandatory for the customer. This checkbox is available if Client-defined value is selected. |
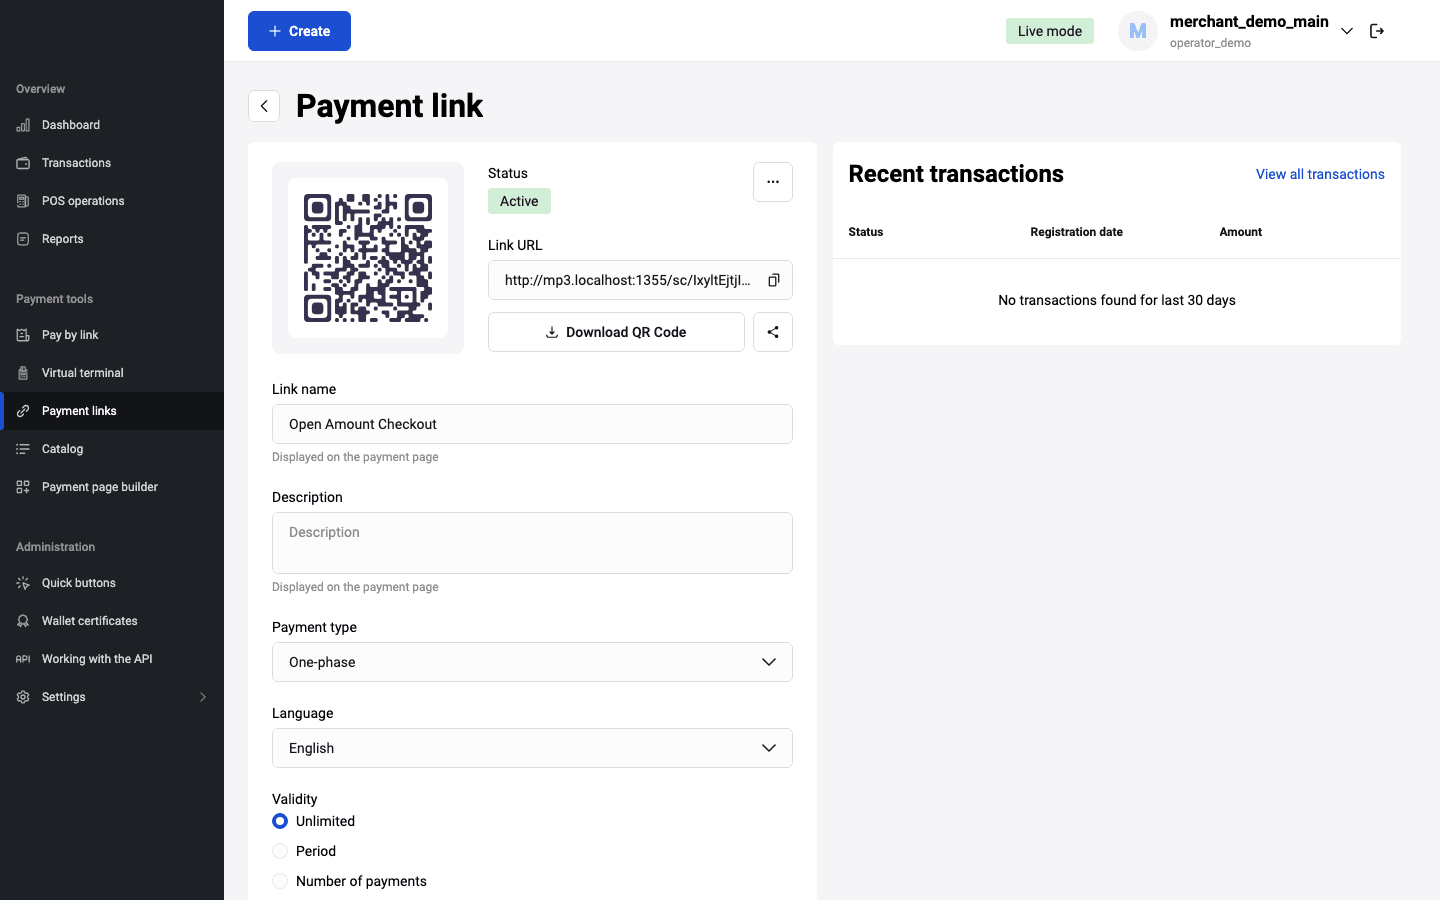
After filling in all the required fields, click Create at the bottom of the form. After that the link will be displayed on the main page with the status Active:
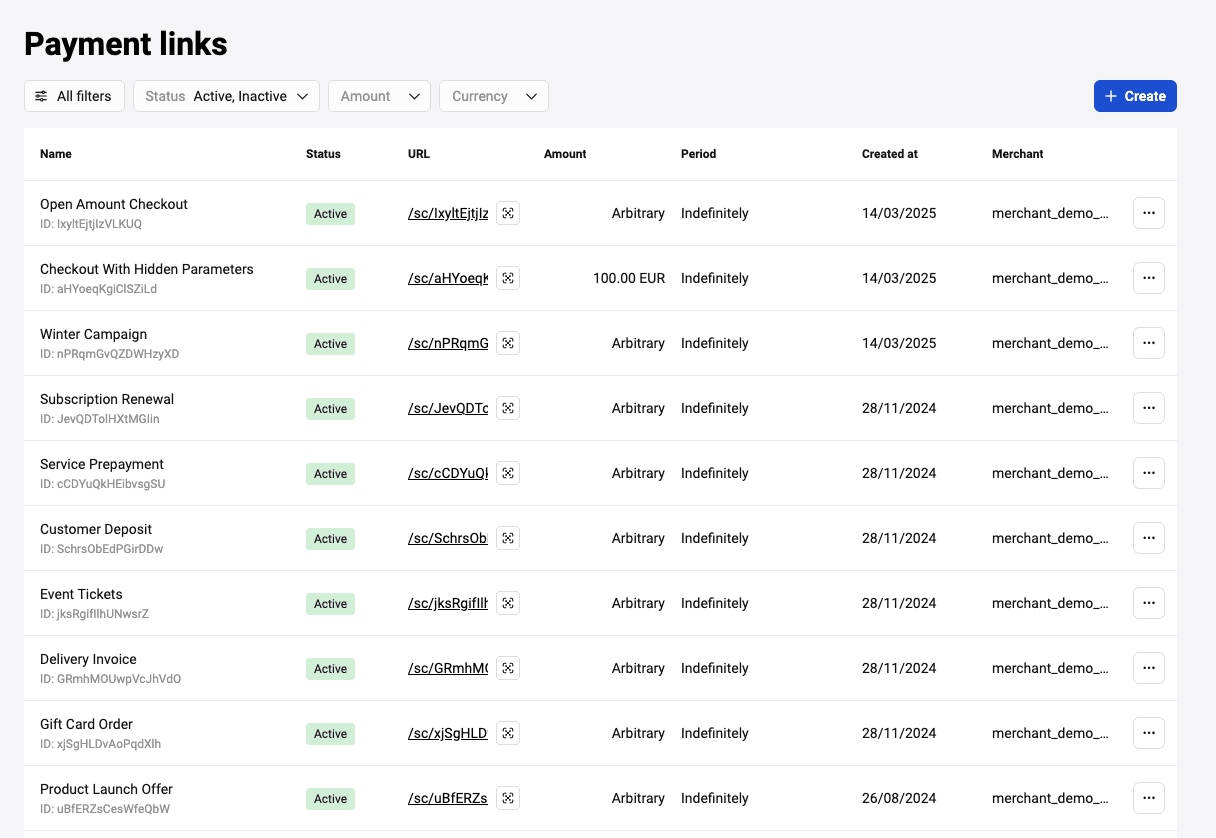
Possible actions with the payment link template
The possible actions are available by clicking on the ![]() icon.
icon.

-
Share — by clicking this button, you will be able to share a link in other applications.
- Copy link — after you click on the appropriate icon a notification appears that the link has been successfully copied.
- Download QR code — you can view the generated QR code and download it one of available formats (PNG/SVG/JPEG).
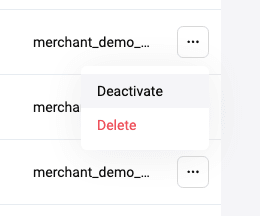
Additionally you can do the following:
-
Activate/deactivate or delete link — click the icon with three dots in the link bar.
Edit link — Click the link to view or edit its details. In addition, all the actions described above are available when viewing the template link. To perform the necessary actions, click the button with the same name as the action.
-
Filter — to form a different sample of payment links, select other filters on the Payment link page. To add more filters, click More filters button. The page for selecting filters will open:
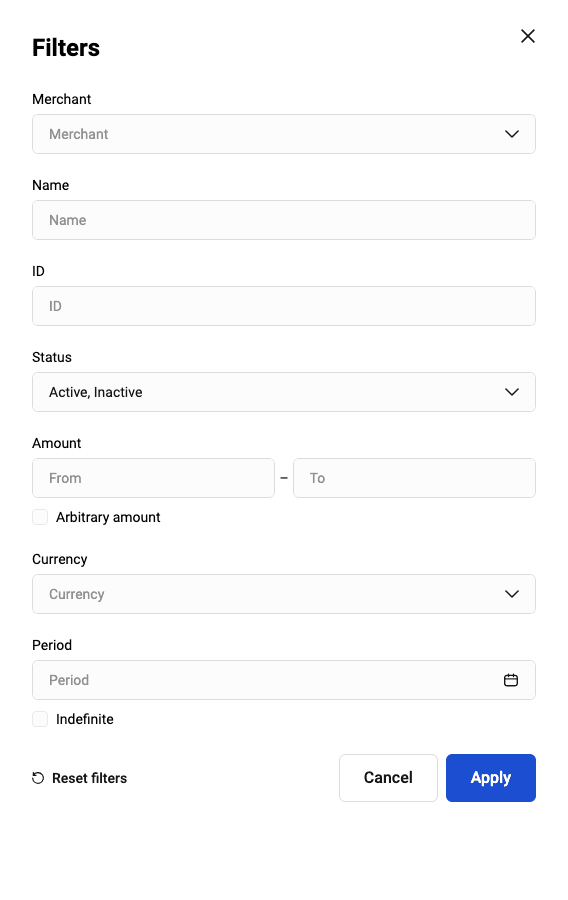
Select the required search criteria and click Apply in the filter window. To clear all filter fields, click the Reset filters button.
You can search by the following parameters:
- Merchant — If necessary, select the merchant from the list of available merchants whose payment links are to be sampled.
- Name — name of the link you set during link's creation.
- ID — identifier of the payment link template.
- Status — three link statuses are possible: Active/Inactive/Deleted. Note that deleted links are not displayed in the table unless the Deleted status is explicitly selected in the filter.
- Amount from - Amount to — Order amount (these fields are not editable if the Arbitrary amount option is activated).
- Arbitrary amount — activate the option if the amount as a search criterion is not important.
- Currency — choose a currency from the dropdown list.
- Period — the validity period set for the link. Click on the dates and select the start date and the expiration date in the calendar (the field is not editable if the Indefinite option is activated).
- Indefinite — activate the option if the validity period of the link as a search criterion is not important.
Pre-payment/Payment page
If additional parameters were specified while creating the link (E-mail/Full name/Phone/Address) or the payment amount field was left blank, the client should fill in the required field(s) on the prepayment page when opening the generated payment link and only then proceed to the payment of the order. An example of the pre-payment page with an additional parameter:
An example of a pre-payment page with an order amount without additional parameters:
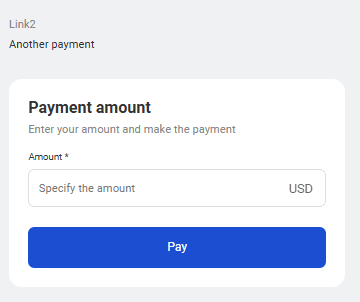
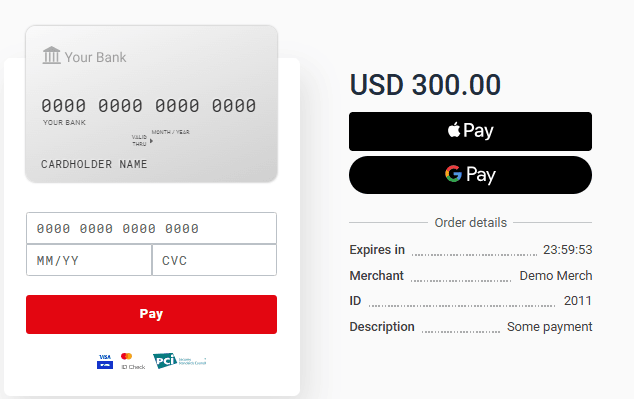
An example of a payment page:
Working with transactions
The Transactions page contains detailed information about orders and payments. To go to the page, click on the ![]() icon in the navigation bar to the left.
icon in the navigation bar to the left.
The top part of Transactions page contains the search area where the filters can be set. The page displays the list of transactions that meet the search criteria.
Using the transactions filter
To work with transactions, you must first define and apply the filter settings.
To set search criteria for transactions, follow these steps.
- In your Personal Area, go to the Transactions page.
- In the search area on the top, set the required filter parameters. To add more filter parameters, click All filters and then click the Apply button.
![]()
Matching transactions will be displayed in the list.
You can copy the search link from the address bar for further usage or bookmark it in the browser.
To reset the filters, click the Reset button.
Transaction filter parameters
![]()
The filter allows you to set the criteria for selecting transactions.
-
Date range — In the first drop-down list, specify by which kind of date the selection should be made. For example, Creation Date. In the second drop-down list, specify the type of time interval:
-
Date range – allows you to set the time interval by selecting the start and end dates in the calendar.
-
Period – allows you to choose the recent period over which the transactions will be shown: day, week, month, or year.
-
Date range – allows you to set the time interval by selecting the start and end dates in the calendar.
- Amount — The order amount. Specify the upper and lower bounds for the range.
-
Status — Order status. The following statuses are available (multiple choice):
-
Created. Invoice is issued but has not been paid yet.
-
Approved. Invoice paid. Funds are reserved on payer's account.
-
Deposited. Funds are charged from payer's account.
-
Reversed. All funds are returned to payer.
-
Declined. Invoice issued but expired without payment.
-
Refund. There had been a partial refund.
-
Created. Invoice is issued but has not been paid yet.
- Order number — The number automatically assigned to the order in the store. If you need to find a specific order, indicate its number here.
- Merchant login — Merchant login in the Payment Gateway system. Enter your login (displayed in the upper right corner).
Last 4 digits of the payment card — The last four digits of the payer's card number used to pay for the order. If you are looking for transactions made with a specific card and you know its number, enter the last four digits here.
-
Payment way — Selects the ways of payment that was used to pay for the order. Possible values:
-
Unknown
-
Payment card
-
Apple Pay
-
Google Pay
-
Mir Pay
-
MTS Pay
-
Samsung Pay
-
Tokenized card
-
Yandex Pay
-
Unknown
See description of other search criteria here.
Transactions table
The transactions table is located on the Transactions page. Transactions appear in the table after the filter is applied.
By default, the table contains the following columns with transaction attributes:
- Amount — The order amount
- Payment type — Means of payment used to pay for the order
- Status — The order status
- Registration date — The date the transaction was registered
Exporting transactions
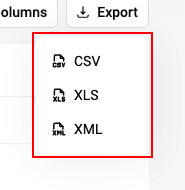
In some cases you may need to export your transactions. The following formats are available: CSV, XLS, or XML. To do so:
- Find the desired transactions by specifying the search criteria in the filter.
- Click the Export button and choose one of the three formats suggested for saving: CSV, XLS, or XML.
- The report generation process will start. Depending on the settings of your browser, either the report file will be downloaded automatically or a dialog box will appear allowing you to choose a location where to save the report file.
Transaction information
Personal Area provides detailed information about each payment.
To learn more about a payment, while on the Transactions page, click on the row of respective transaction in the table.
The Transaction page will open. It contains the following tabs:
- Operation details
- Activity
- Refund tab (for transactions of some statuses).
Also, depending on the status and type of transaction, the Complete and Refund buttons may be present on this page.
The Complete button is used to confirm two-phase payments from clients. This button is active only when the order is in the Approved status.
The Refund button is used to return the payment to the client. The functionality of the button depends on the status of the order and whether a shopping cart was used or not.
- In case of orders with a shopping cart in the Deposited status, the Refund button opens the Refund tab, where you can select line items to be returned or refund the entire amount of the order.
- In all other orders, the Refund button opens a refund window, where a monetary amount is indicated.
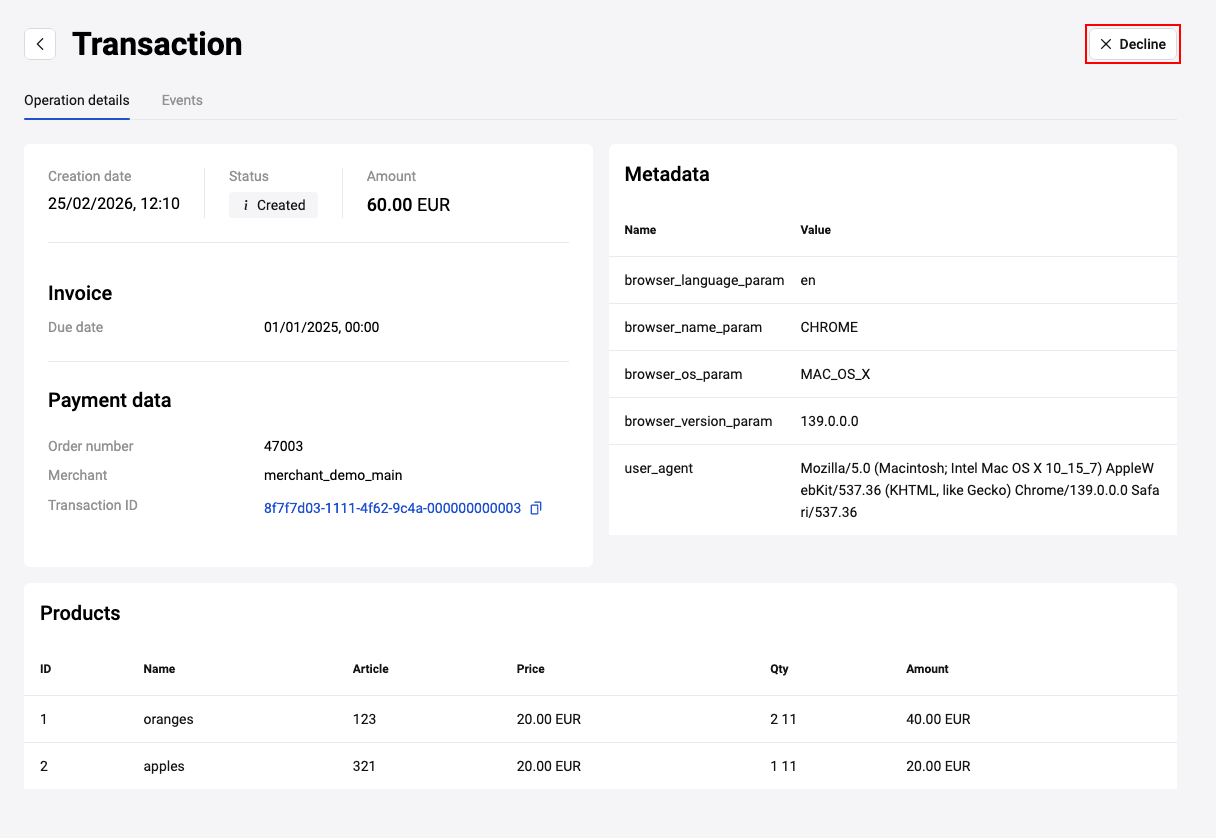
Operation details
The transaction details are shown on the Operation details tab which contains the following sections:
- Payment data – This section shows the attributes of the transaction
- Customer – Here you can find information about the card and the payer
- Metadata – Some additional technical details
- Products – Information about which goods or services were paid for as part of the transaction (is displayed only if the order contains a product cart)
The upper part of the tab contains the following data:
- Creation date – Date and time of payment creation
- Status – The payment status
- Amount – The amount payed
Fields in the Payment data section:
| Field | Description |
|---|---|
| Order number | Order number in the store system. |
| Merchant | Merchant login in Payment Gateway system. |
| Transaction ID | Order ID in the Payment Gateway. |
| Source | The link to the invoice related to this transaction (if the invoice was created via the Merchant Portal, see Invoices). |
| Response code | A numeric code of a result received from a processing bank (action code). See the list of action codes here. |
| Payment type | Means of payment used to pay for the order. |
| Fee | The amount of the fee (if charged). |
| Registration amount | The order amount. |
| Approved amount | The amount that was held on the payer's card but not captured yet in two-step payments. |
| Deposited amount | The amount that was actually debited. |
| Refunded amount | Refund amount, if a refund was made. |
| ECI |
Electronic Commerce Indicator. Possible values are:
|
| Order description | Arbitrary description of goods and services |
Fields in Customer section:
| Field | Description |
|---|---|
| Card number | Masked number of the card used for payment. |
| Expiry | The payer's card expiration date. |
| Payment system | The name of the International Payment System (card network) to which the payer's card belongs. |
| Bank name | Name of the bank that issued the card. |
| Bank country | Country of the bank that issued the card. |
| IP address | IP address of the payer. |
| Cardholder name | Cardholder name used for payment. |
| Payer's e-mail address. |
The Products section contains information about goods and services paid for in the transaction.
| Column | Description |
|---|---|
| ID | Number of a line item in the cart. |
| Name | The name of the line item. |
| Article | Alphanumeric ID of a line item (vendor ID). |
| Price | Price of one product unit. |
| Qty | The quantity of the line item. |
| Amount | The total amount for specified line item (calculated automatically). |
| Refund | Refund amount. Displayed only if there was a refund. The |
If you have configured fiscalization, the following columns are also displayed (the set of values may slightly differ depending on the FFD version):
| Column | Description |
|---|---|
| Payment subject | Payment subject, available values:
|
| Payment method | Payment method. Possible values:
|
| Commodity nomenclature code | Commodity nomenclature code. |
| Tax type | VAT rate, the following values are available:
|
| Tax amount | Tax amount calculated by the seller. Specified in minimum currency units. |
| Excise | Excise amount. |
| Country code | Digital country code. |
| Declaration number | Customs declaration number. |
In the case of selling goods under an agency agreement, the additional OFD parameters may be displayed in the product details:
| Field | Description |
|---|---|
| Agent type | Agent type, available values:
|
| Payment agent operation name | Payment agent transaction name. |
| Payment agent phone number | Payment agent phone number. |
| Name of the transfer operator | Transfer operator name. |
| Taxpayer identification number (INN) of the transfer operator | Transfer operator INN. |
| Address of the transfer operator | Transfer operator address. |
| Transfer operator phone number | Transfer operator phone number. |
| Supplier INN | Supplier INN. |
| Supplier name | Supplier name. |
| Supplier's phone number | Supplier phone number. |
Activity
The Activity tab contains information about all events relevant to the order: payments, refunds, etc.
| Column | Description |
|---|---|
| Type | Type of the operation made while working with the order. |
| Status | Operation status. |
| Date | Date and time when the operation was made. |
| Description | The order amount. |
Refund
The Refund tab contains information about line items in the order and allows making a refund to the payer. The refund can be made for the full amount or for specific line items.
Full refund
To issue a full refund to the payer for the order, follow these steps:
While on the Refund tab, click on the Full refund button. The order status will become Reversed or Refunded, depending on the payment stage and the date the refund was processed:
Refund for specific items
To issue a refund for specific items, follow these steps:
-
While on the Refund tab, use the table with content of the shopping cart.
Column Description Name The name of the line item. Article Alphanumeric ID of a line item (vendor ID). Price Price of one product unit. Qty The quantity of the line item. Amount The total amount for specified line item (calculated automatically). Refund Qty The number of items to be returned. Refund amount The amount to be refunded. The field is calculated automatically. In Refund Qty field, indicate the number of items for which the refund should be issued. The resulting amount will be populated in the Refund amount field.
-
Click on the Refund button.
If the refunded amount is less than order amount, the order status will become Refund. If the refund is for full amount, the order status will become Reversed.
Available operations with a transaction
The main operations that can be carried out with transactions in the Personal Area are:
These operations are invoked by corresponding buttons on the Transaction page. See the detailed description of each operation below.
Order cancellation
Usually an order that is neither paid nor pre-authorized is automatically cancelled after a certain time set in the system, for example, after 20 minutes. But this operation can be performed manually from the merchant's Personal Area.
If you want to cancel an order before payment or pre-authorization, you can do it by clicking the Decline button on the Transaction page.
After cancellation, the order gets the Declined status.
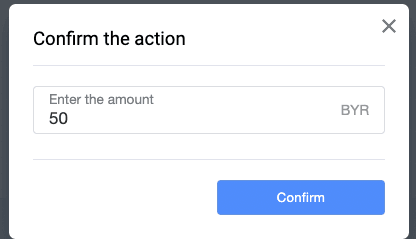
Order completion
In case of a two-phase payment, the funds are first reserved on the client's account (order status is Approved) and only then are credited to the merchant's account (order status is Deposited). It is possible to configure that the final transfer takes place automatically after a certain time set in the system, e.g. after 24 hours. But this operation can be performed manually from the merchant's Personal Area.
To complete a transaction, while on the Transaction page, click on the Complete button.
A confirmation window will open. Its appearance is shown below and depends on whether the cart was used in the order or not.
If the cart was NOT used, the confirmation window looks like this:
![]()
Check the value in the field and click on the Confirm button.
If the cart was used, the confirmation window looks like this:
Check the data, change it if necessary and click on the Complete button. After the completion, the order gets Deposited status.
If there are necessary permissions, you can adjust the shopping cart in a way that the completion amount will exceed the pre-authorization amount. The percentage by which the deposit amount may be exceeded can be set to any value - it is determined by a specific setting. To activate this feature, please contact technical support.
As an example, let's say the percentage by which the deposit amount may exceed is set at 100% in the settings. You have entered an amount of 910 RUB in the payment form. Then you can modify the cart so that the capture amount does not exceed 1820 RUB. If it does exceed, an error message will appear and the Complete button will become disabled.
Reversal
From your Personal Area, you can reverse payments for two-stage transactions in Approved status (when the funds are reserved on the client's account but not deposited yet). Reversal means that the transaction is canceled and all the reserved funds are released.
To make a reversal, while on the Transaction page, click the Refund button.
![]()
The functionality of this button depends on the status of the order and whether a shopping cart was used or not. If the order status is Approved (with or without shopping cart), this button allows to reverse the whole amount only.
In the confirmation window, click Confirm. The order will get the Reversed status.
Refund
From your Personal Area you can issue full or partial refunds on orders paid by customers (when the order status is Deposited). For two-phase payments, the Deposited status means that the funds held on the payer's card have already been debited.
Refunds are issued from the Transaction page by using the Refund button.
The functionality of the button depends on the status of the order and whether a shopping cart was used or not.
- In case of orders with a shopping cart in the Deposited status, the Refund button opens the Refund tab, where you can select line items to be returned or refund the entire amount of the order. The refund process for such orders is described here.
- In case of orders without a shopping cart in the Deposited status, the Refund button opens the refund confirmation window.
![]()
Check the data, change it if necessary and click on the Confirm button. After the completion, the order gets Deposited status.
Reverse/Refund specifics depending on phases, status, and shopping cart
The table below shows all the options of Refund button depending on the status of the payment, the number of phases in it, and whether a shopping cart is used or not. The logic can vary depending of your permissions. As a general rule, Merchant Portal makes a reversal if possible, and if not, makes a refund.
| Type | With cart | Without cart |
|---|---|---|
| One-phase | Deposited - refund for specific items | Deposited - refund in amount, partial available |
| Two-phase |
Approved - reversal, full amount only Deposited - refund for specific items |
Approved - reversal, full amount only Deposited - refund in amount, partial available |
Closing OFD receipt
If you have configured fiscalization settings, you can send a closing receipt to the OFD system. This operation is possible for orders in the following statuses:
- Approved (for two-phase payments, when Fiscalization upon pre-authorization option is enabled in the OFD settings),
- Deposited,
- Refund (partial refund has been made).
To close an OFD receipt, click the Close receipt button on the transaction detais page.
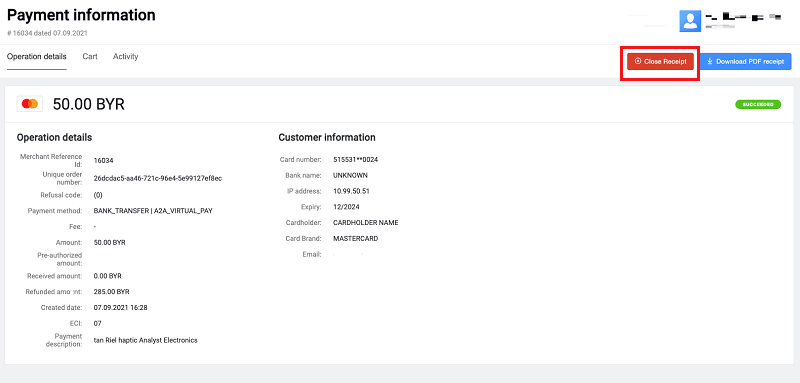
For an order without shopping cart, the confirmation window appears. Edit the amount of the closing receipt, if necessary, and then click Confirm.
If the order contains a shopping cart, the table of cart items will be displayed. The set of displayed parameters depends on the configured OFD system. Edit the cart parameters, if necessary, and then click Confirm.
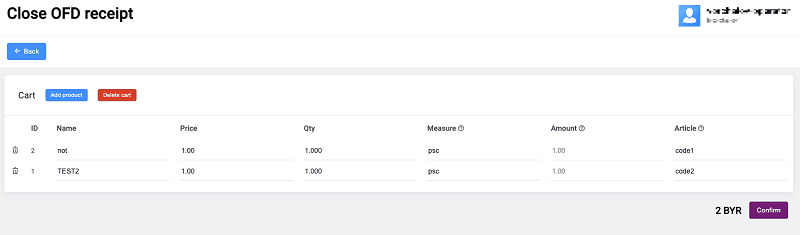
The closing receipt will be sent to the OFD system.
Catalog
The Catalog section provides a quick way to select items when creating an invoice. To access the Catalog section, click ![]() in the left sidebar.
in the left sidebar.
The page will be displayed:

To get started, select a merchant from the drop-down list, download the catalog template clicking Download Catalog Template button and fill in your item parameters:
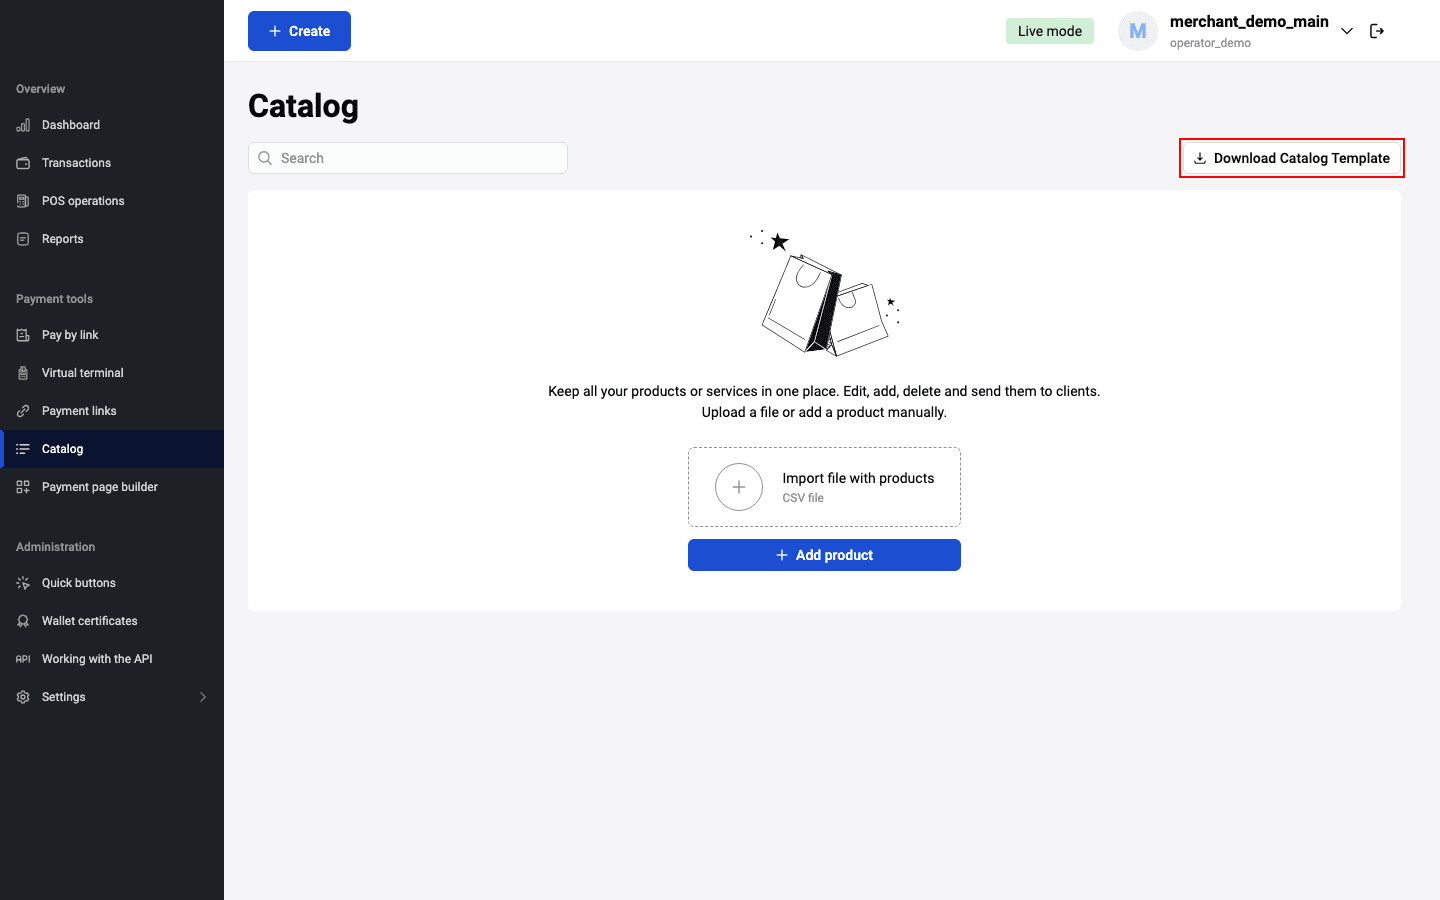
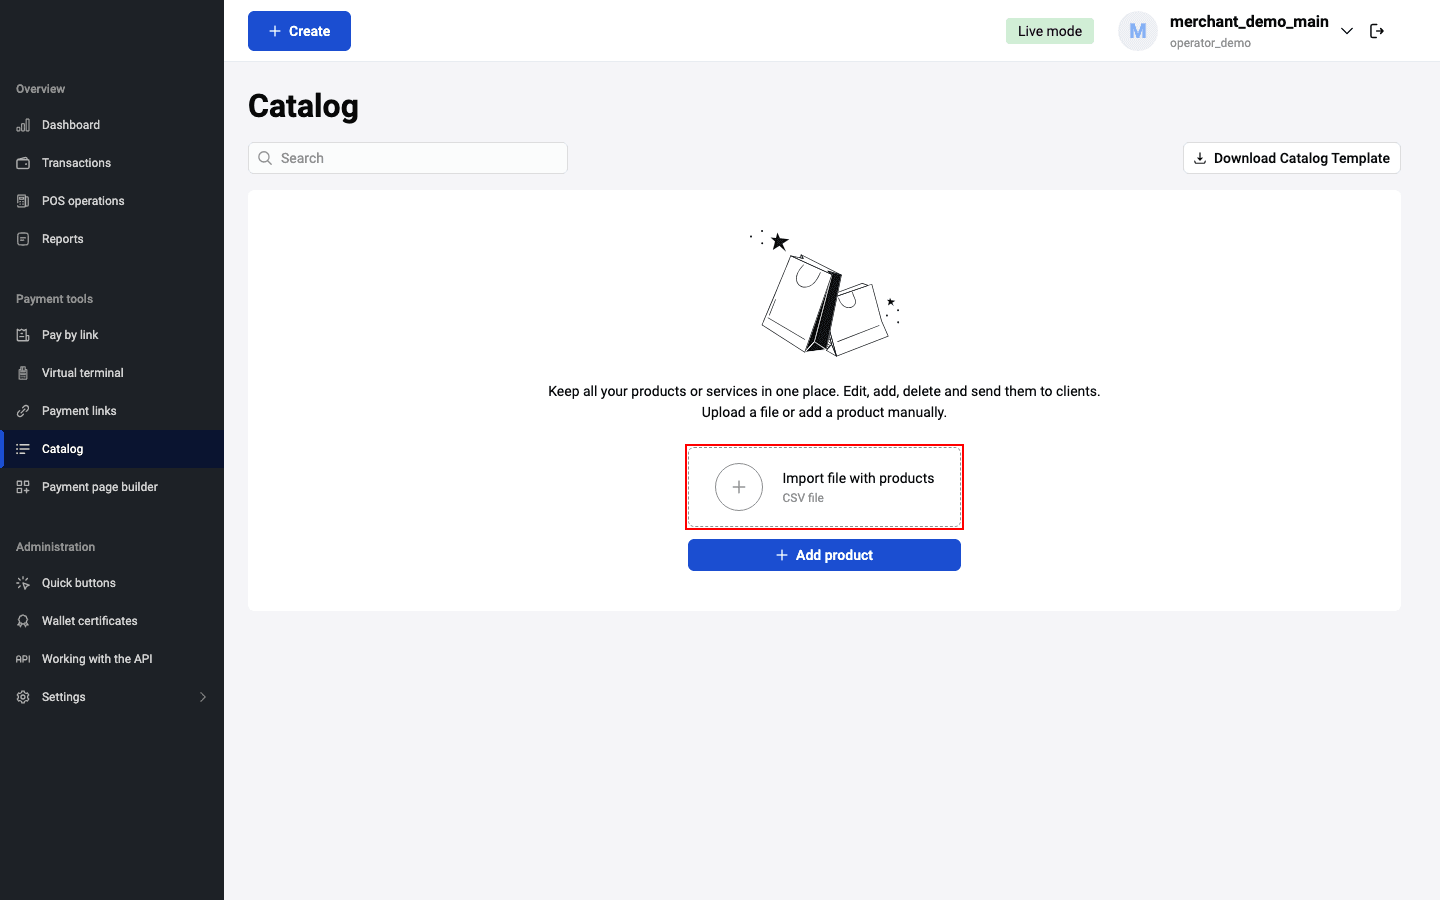
Then upload the completed catalog in .CSV format by clicking Import file with products:
Alternatively, add the product by clicking the corresponding button.
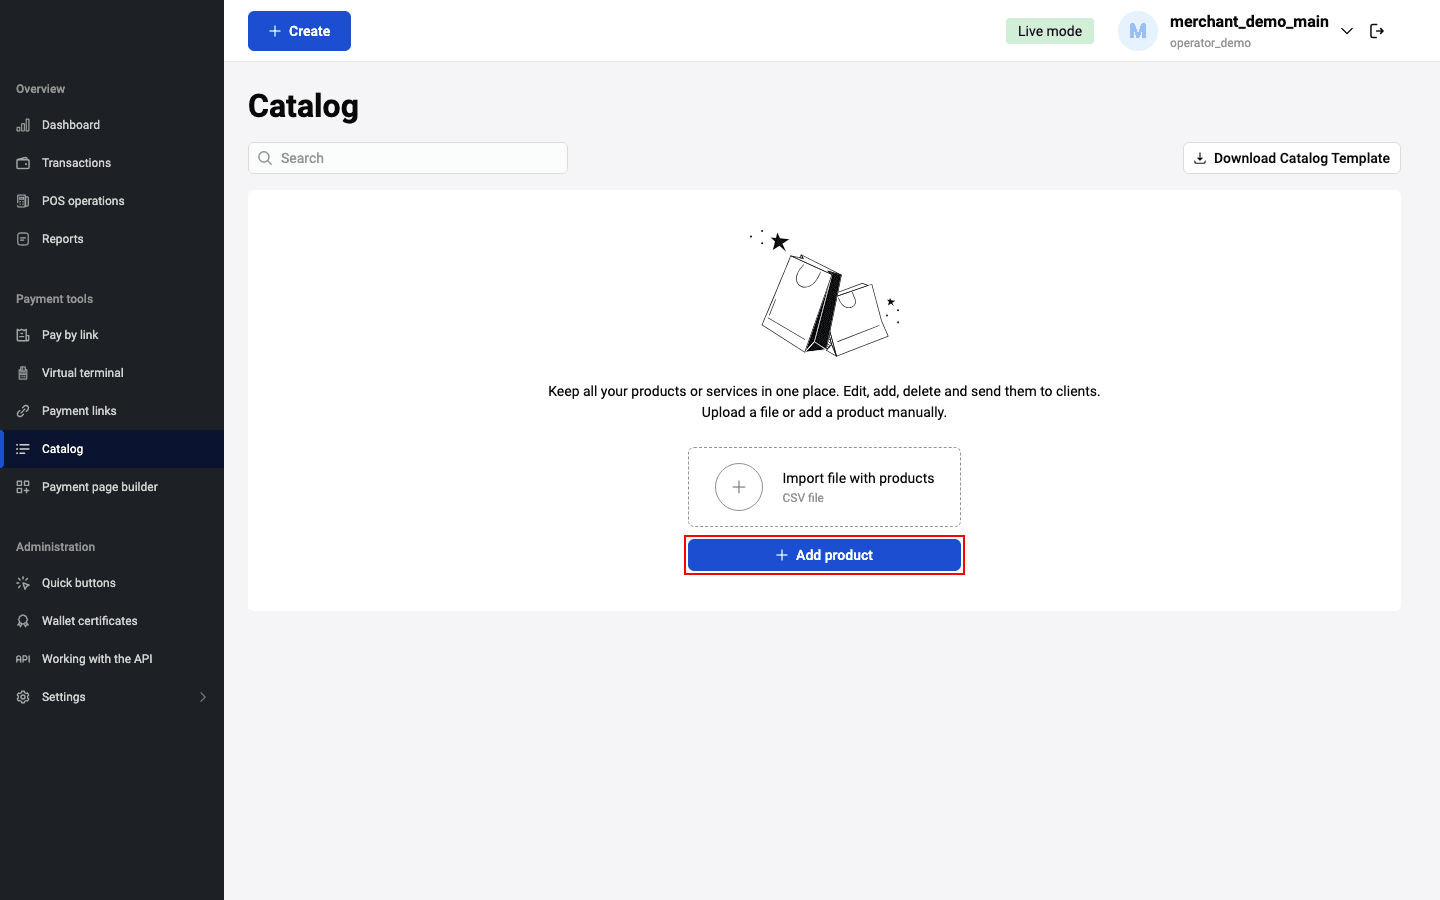
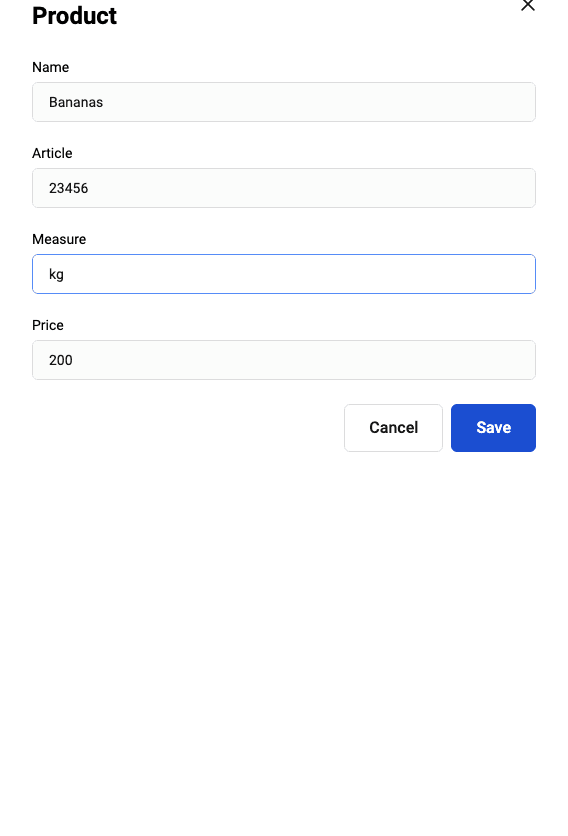
A form will open to fill out information about the product.
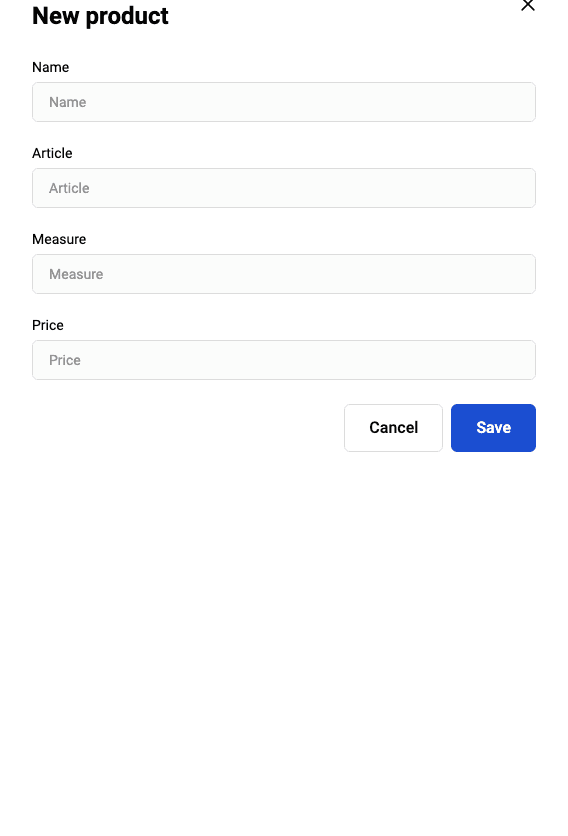
Fill in the required fields referring to the table below.
| Field | Description |
|---|---|
| Name | Product/service name. |
| Article | The vendor code of the line item. |
| Measure | Units of measurement, for example: L – liters, pcs. – pieces. |
| Price | Price of one product unit. |
After uploading the catalog or product it will be available to add items from the catalog to the invoice. For more information on adding items from the catalog, please see the Pay by link section.
In addition to adding a product to the catalog, you can, if necessary, make changes to the parameters of the added product, or delete it from the catalog. To do this, mouse over the item line in the list and click the appropriate button:
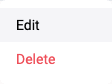
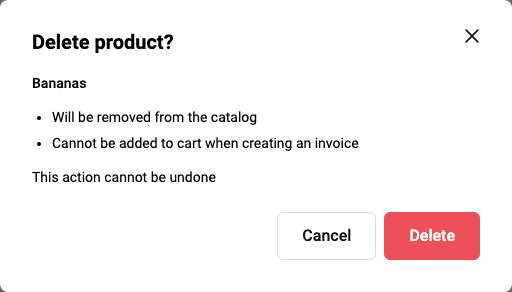
Clicking the Edit button opens a form for making amendments to the product:
Clicking the Delete button opens a confirmation window to either proceed with deletion or cancel it: